Affichage des articles dont le libellé est things. Afficher tous les articles

lundi 6 juillet 2015

13 things every Samsung Galaxy S6 owner should do


So, you’ve got a shiny new Samsung Galaxy S6? Congratulations on your new device! You made a good choice. Now it’s time to set up this bad boy and get the most out of it. In addition to helping you unlock some of the unique features and advanced settings on the Galaxy S6, we’ll help ensure you don’t overlook any simple but important details. Let’s get started!


1. Set up your Samsung account


Samsung Galaxy S6 Samsung account setup


You don’t have to sign up for a Samsung account, but if you don’t you will miss out on some of the stuff in this guide. It’s best to just do it now. If you’ve ever had a Samsung device in the past you probably already have an account. You can simply sign in and be on your way. For everyone else, it only takes a minute.


Samsung now lets you associate your Samsung account with a Google account. This is the easiest way to do it since you already signed into the phone with a Google account. Whichever way you choose to sign in, just follow the steps until you’re done. Now we can move on to more interesting features.


2. Migrate data from old device


Samsung Galaxy S6 transfer content


Whether you’re coming from another Android device or an iPhone/iPad, you’ll want to migrate all your old stuff to your new Galaxy S6. Samsung has an app that will make the process easy. First thing you’ll want to do is download Samsung Smart Switch Mobile from the Play Store.


Switching from an iPhone or iPad


  1. In the Smart Switch app select Import from iCloud and enter your Apple ID and password

  2. Choose the content you wish to transfer and tap Let’s start the transfer

  3. Next you’ll see Android apps equivalent to the ones on your iPhone/iPad. Tap the ones you wish to download

  4. You’ll also want to disable iMessage, which you can find out how to do here.


Switch from another Android device


  1. Make sure the Smart Switch app is downloaded on both your Galaxy S6 and old device

  2. Place the two devices within 4 inches of each other

  3. Select the content you wish to transfer and tap Transfer

  4. Tap OK on your Galaxy S6 to receive all the content


3. Set up the improved Fingerprint Sensor


Samsung Galaxy S6 fingerprint setup


Now that you have a new phone you’re going to want to protect it. The Galaxy S6 makes it really easy to protect your phone with the new and improved built-in fingerprint scanner. You don’t have to mess with any passwords or patterns to unlock your device. It’s simple to use and simple to set up for the first time.


  1. Navigate to Lock screen and security in the Settings

  2. Next tap on Fingerprint and then +Add fingerprint

  3. Follow the instructions until 100% of your fingerprint has been scanned

  4. Create a backup password

  5. Tap Ok to Enable Fingerprint Lock

  6. Now to unlock your phone simply hold your finger on the home button


If someone steals your phone the fingerprint scanner might keep them out of your personal data, but it won’t return the phone for you. We’ve got a guide to help you find a lost or stolen phone.


4. Customize your home screen


Samsung Galaxy S6 customize home screen folders


Obviously one of the first things you’re going to want to do is customize the home screen. The stock TouchWiz launcher makes it very easy to get the look you want. You can rearrange the icons, create folders, add widgets, and change the wallpaper.


  1. Long press on any blank area on the home screen

  2. 4 buttons will appear for Wallpapers, Widgets, Themes, and Screen grid

  3. Press the Wallpaper button to choose a new wallpaper from your gallery or downloaded apps

  4. The Widgets button will bring up all the available widgets you have installed

    • To use one simply drag it onto the home screen


  5. The Screen grid allows you to choose how many apps you want to be able to place on the home screen

    • It can be 4×4, 4,5, or 5×5


  6. To learn how to change the Theme of your home screen read the next tip below


5. Try the new themes


Samsung Galaxy S6 Themes


The new trend in mobile software is themes, and we love it. Being able to customize every inch of your device is one of the things that makes Android so great. The Galaxy S6 comes with the ability to choose themes that can change your wallpaper, icons, and even system apps and UI. They’ve included a bunch of themes that you can try out and use on your device.


  1. Open the Themes Store app

  2. Browse the themes and select one you like

  3. Tap on Download

  4. Now you can select Apply and it will take you to your home screen


6. Delete and disable bloatware


Samsung Galaxy S6 uninstall delete apps


Samsung has made an effort to “trim the fat” in TouchWiz, and for the most part they’ve done a pretty good job. There are still a few apps that can be considered “bloatware.” It used to be downright impossible to remove bloatware apps from Android devices, but thankfully it’s easy to do nowadays.


It was first rumored that it would be possible to uninstall all pre-loaded apps. That wasn’t entirely true. Some system apps can be uninstalled, but others can only be disabled. A disabled app won’t appear in your app drawer and won’t be able to run in the background, but it will still be present on the device. For all intents and purposes it’s gone.


  1. Open the app drawer and tap the edit button

  2. Minus icons will appear on any app that can be uninstalled or disable

  3. Tap the minus icon on the apps you wish to remove


Some of the apps you might want to uninstall/disable include Hancom Office 2014, Microsoft OneNote, Lookout, Milk Video, Milk Music, and carrier specific apps.


Best Samsung Galaxy S6 cases


7. Get rid of the “Briefing” news feed panel


Samsung Galaxy S6 removing Flipboard screen


On the Galaxy S5 there was a special section of the home screen called “My Magazine.” This section is still present on the Galaxy S6, but it has been renamed to “Briefing.” It basically just aggregates news stories from a number of different sources. The idea sounds cool, but the interface is a little laggy. You should remove it.


  1. Long press on the home screen

  2. Scroll over to the Briefing panel on the far left

  3. Uncheck the checkbox at the top


If you really do like the Briefing feature we recommend downloading the Flipboard app. The Briefing panel is actually powered by Flipboard, so you get a similar interface, but it runs much smoother in its own app.


8. Use Google Now as your own personal assistant


google now


The Google Search app is for much more than just searching for stuff. Included in the Google app is a service called Google Now. With this service enabled you will get helpful notifications called “Cards” throughout the day. They will just show up without you having to do anything. It’s like having a personal assistant that knows your every need. Here’s how to use it.


  1. Open the Google app and select Get started

  2. When it asked to Set up Google Now select Yes, I’m in

  3. Swipe from the left of the display and select Customize from the slide-out menu

  4. Here is where you can choose the things Google Now will help you with, such as travel time and sports scores

  5. Swipe away cards when you don’t want them and Google will learn

  6. That’s it!


9. Edit the Quick Settings toggles


Samsung Galaxy S6 Quick Settings 1


Samsung includes a ton of Quick Setting toggles in the notification shade by default. You can access these by swiping down from the top of the display. You can edit the order of these toggles, or remove some completely. If you use these toggles a lot (which you should), a quick edit now will make your life easier.


  1. Pull down the Quick Settings and tap EDIT in the top right corner

  2. From here you can drag the toggles around as you like

  3. There must be at least 5 toggles in the Quick Settings


10. Optimize your battery life


One of the most important things with any smartphone is battery life. There is nothing worse than when your phones dies at an inopportune moment. To get the most out of your Galaxy S6 there are a few way you can optimize the battery life.


Use a pure black wallpaper


Samsung Galaxy S6 new themes


Samsung devices use AMOLED displays to achieve the vibrant colors and deep blacks that people love. AMOLED displays actually illuminate individual pixels, which means black pixels are not illuminated at all. You can theoretically get better battery life by using a pure black wallpaper and black themes in apps, or check out the Pixel OFF app.


Enable Power Saving Mode


Samsung Galaxy S6 Ultra Power saving mode


The more traditional way to save battery is with the built-in Ultra Power Saving Mode. When this mode is enabled it switches the phone to a black and white interface and disables most background activities. You’ll still be able to take calls, send messages, and use a few important apps.


There is also the less extreme Power Saver Mode. When this mode is enabled the screen brightness will turn down and the processor will scale back. You can set Battery Saver to automatically turn on at any level between 50-15%. Configure it in Settings > Battery > Power saving mode.


11. Master Android Lollipop features


Lollipop tips tricks


The Samsung Galaxy S6 is running the latest version of Android, called Lollipop. With this new version comes quite a few new features that you’ve probably never used. Luckily for you we’ve already got a great guide for using Android Lollipop. Check out our 15 Tips & Tricks for Android Lollipop Users (that’s you!). The steps for some of these may be slightly different on the Galaxy S6, but it should be very similar.


12. No SD Card, No Problem


Samsung Galaxy S6 OneDrive promo


Samsung decided to remove the microSD card slot from the Galaxy S6. Some people are upset by this decision, but more and more devices are doing it. The good news is there are plenty of ways to extend the storage capacity of your device without a SD card. The Galaxy S6 comes with both Google Drive and OneDrive for cloud storage, Dropbox is another popular choice for cloud storage.


You may have noticed a notification to back up your photos to OneDrive when you first booted up the phone. If you already did this you’re good to go. Microsoft is throwing in 100GB of free storage for Galaxy S6 users. Here’s how to do it:


  1. Open OneDrive and sign in or create an account

  2. Go to Settings and select Camera backup

  3. Toggle the switch on and select your desired options

  4. All your photos will automatically be backed up. You can also manually add files to your OneDrive


Got the Galaxy S6 Edge?


If you have the Samsung Galaxy S6 Edge we’ve got a separate guide with all the special Edge-scree features. Everything in this guide will also work on the Galaxy S6 Edge, but you’ll want to read all about the Edge-screen features too. Go check it out!


13. Get help on the Samsung Galaxy S6 forums


Samsung Galaxy S6 all colors DSC08553


Now that you’re the proud owner of a Galaxy S6 you can join the Galaxy S6 forum over at Android Forums. You’ll find conversations about customization, troubleshooting problems, accessories, and much more. It’s the best place to go to ask questions and learn more about your new phone. Here are a few threads you may be interested in:


11 things every HTC One M9 owner should do


htc-one-m9-rear-straight


The HTC One M9 might just be the best Android device on the market, but if you go in flying blind you could very likely miss out on some of the key features that make your device great. Before you get too far ahead of yourself, here are the top things every new One M9 owner should know.


HTC One M9: Read our full review


1) Migrate data from your old Android device


If you wish to transfer data from your old smartphone to your new One M9, you can easily accomplish this in one of several ways. Your first opportunity arrises during initial setup, when you will be prompted to use Android Lollipop’s Tap & Go functionality to restore settings and data from another Android phone (note that your old Android device will need to have NFC compatibility for this operation to function successfully).


Tap & Go during initial setup


To use Tap & Go, you will place the two devices back-to-back when prompted (make sure both are on, unlocked, and with NFC enabled). You will then be asked to sign in to your Google account and agree to Google’s terms of service, after which data will be copied to your One M9.


Restoring data after initial setup


one-m9-data-transfer_2015-04-01-11-58-21one-m9-data-transfer_2015-04-01-11-58-26

If you skipped over your chance to restore data with Tap & Go, if your old Android device does not have NFC, or if you are restoring data from an iPhone or other cellular device, HTC makes this process fairly straight forward as well. To do so:


  1. From Settings, navigate to Get content from another phone

  2. Choose the type of phone from the menu

  3. If using an HTC or other Android phone, choose whether to do a quick or full transfer

  4. For an iPhone, choose whether to restore from iCloud, iTunes, or to transfer contacts over Bluetooth

  5. For all other phones, follow the onscreen prompts


For each type of phone the process will be slightly different, but your One M9 will guide you through the entire process.


2) Sign up for HTC Uh Oh Protection


With the One M9, HTC has made the bold move of including so-called Uh Oh Protection with every device. HTC One M9 owners are entitled to a one-time, free replacement of their phone should it suffer water damage or a busted display.


Even if you are pamper you phone and throw it in an indestructible case there is still reason to register for HTC’s warranty program. Uh Oh Protection will also cover the cost of a new One M9 should you switch carriers after buying your new phone. If you never need a replacement, HTC will give you 0 towards the purchase of next year’s One model. Simply put, signing up for Uh Oh Protection is a must for any new One M9 owner.


You will be prompted to do so during initial setup by logging into your HTC account (or creating a new one using your Google ID). If you skip this step, you can visit HTC’s Uh Oh Protection landing page for more info on how to contact HTC support to get started.


…and protect yourself should your One M9 be lost or stolen


If you want to protect your One M9 from prying eyes or keep your personal data safe should it be lost or stolen, you will definitely want to enable one of several screen lock options. To do so, navigate to Settings > Security > Screen lock. You can change the default lock screen with no security measure, no lock screen at all, or PIN, password, or pattern locks.


Should your phone be misplaced or even stolen, you will want to log into Google’s Android Device Manager, where you can track it, ring it, lock it (and change to a new password) or erase its contents from afar. Visit the Android Device Manager web portal to make sure your current device is set up. You can also download the Android Device Manager app.


3) Take it easy if you need it


one-m9-easy-mode_2015-04-01-10-28-24one-m9-easy-mode_2015-04-01-10-28-31one-m9-easy-mode_2015-04-01-10-28-36

If you are new to using a smartphone (or if you are setting up a phone for an older or inexperienced user), you can quickly change the One M9’s homescreen launcher to what HTC dubs Easy Mode.


Easy Mode features a straightforward homescreen with big, easy to see icons and text. Menus also feature larger fonts for easy reading. This mode does strip out some of the functionality of the One M9, but it provides just enough to ease newer users into the experience.


To enabled Easy Mode, navigate to Settings > Personalize > Change Home screen launcher and select ‘Easy Mode.’ Do the same to return to the standard Sense 7 interface.


4) Choose your theme and personalize your experience


HTC has made changing the look of your One M9 easy with the included Themes app. The app functions as showcase for HTC and user-created themes that alter everything from wallpaper and color scheme to icons and navigation buttons. You can browse a selection of pre-installed and downloadable themes for the one that fits your mood, then simply tap apply and say hello to your new homescreen.


If none of the included options fit your fancy, the app also offers individual downloads of wallpapers and icon packs, allowing you to build your own custom themes in no time. The app will even generate a custom color theme based on your wallpaper image should you have a hard time deciding.


To create your own theme:


one-m9-custom-theme_2015-04-01-10-27-49one-m9-custom-theme_2015-04-01-10-27-59one-m9-custom-theme_2015-04-01-10-28-04


  1. Open the Themes app

  2. Tap the menu icon in the upper lefthand corner

  3. Scroll down and tap “My themes”

  4. Tap the ‘+’ in the upper righthand corner

  5. Choose a wallpaper to start building your theme


Upon choosing a wallpaper you may either choose from a selection of of pre-made bundles that pair fonts, icons, colors, and sounds, or you can tap ‘Edit’ to customize the individual aspects of your theme. Once you have settled on the perfect look, give the theme a name to save it to your library for quick access in the future.


You can access further customization settings by navigating to Settings > Personalize.


5) Customize your navigation bar


one-m9-navigation-buttons_2015-04-01-10-33-22one-m9-navigation-buttons_2015-04-01-10-33-27one-m9-navigation-buttons_2015-04-01-10-33-49

Sense 7 on the One M9 offers for the first time the ability to rearrange, change, and add to the software navigation buttons found in Google’s Android OS. Don’t find yourself using the multitasking key very often? Replace it with a quick settings shortcut. Or go with both. You have options.


To customize the navigation bar, navigate to Settings > Personalize > Change navigation buttons. From this screen you can check the boxes next to the items you wish to see appear in the navigation bar and also drag to re-order them.


6) Configure BlinkFeed (or remove it completely)


one-m9-blinkfeed_2015-04-01-11-59-26one-m9-blinkfeed_2015-04-01-11-59-32

BlinkFeed is HTC’s all-in-one landing for your news feeds, social updates, and new location-based suggestions, all easily accessed with a simple swipe to the left from your homescreen. Configuring BlinkFeed to work the way you want is easy.


To add or remove items from BlinkFeed:


  1. From your homescreen, swipe all the way to the left to access BlinkFeed

  2. Tap the menu icon in the upper lefthand corner

  3. Tap the three vertical dots to access the expanded menu

  4. From the menu tap Add content or Remove content


You will now be able to choose the content you wish to view in your BlinkFeed by choosing from a selection of news sites and blogs (or alternatively unselecting the sources you no longer wish to receive updates from).


To link a social network like Twitter or Facebook:


  1. From your homescreen, swipe all the way to the left to access BlinkFeed

  2. Tap the menu icon in the upper lefthand corner

  3. Tap the three vertical dots to access the expanded menu

  4. Tap Services & Apps

  5. Select the desired service from the menu and follow the prompts to log in


To enable to disable location-based suggestions


  1. From your homescreen, swipe all the way to the left to access BlinkFeed

  2. Tap the menu icon in the upper lefthand corner

  3. Tap the three vertical dots to access the expanded menu

  4. Tap Settings

  5. Select Notification on lockscreen

  6. Check or uncheck Meal time bundle


Remove BlinkFeed from your homescreens


If you wish to remove BlinkFeed from your homescreen rotation altogether, you can do that as well. Simply navigate to the BlinkFeed settings menu as described above, select Manage home screen panels, select your BlinkFeed panel, and tap Remove. You can restore BlinkFeed at any time by navigating to Settings > Personalize > Manage Home screen panels.


7) Access apps continually tailored to your location


one-m9-sense-home_2015-04-01-11-59-58one-m9-sense-home_2015-04-01-12-00-06

Sense Home is designed to learn the apps you use and where you use them, presenting them to you in a neatly organized homescreen widget for easy access when you need them. It does work, but it’s going to take some time for Sense Home to learn your habits. You can speed this process up by adding and organizing your apps manually.


Simply select the location view you wish to modify by tapping the dropdown menu in the widget then drag and drop your selected apps from the homescreen or app drawer. It’s that simple.


Should you decide you have little use for Sense Home, you can remove the entire widget, too. Much like any other widget, simply long-press and drag to the trash can when it appears. Likewise, if you want to re-add the Sense Home widget, do so by long-pressing a blank area of the homescreen, tapping “Add Widget,” and selecting Sense Home.


8) Master top features of Android Lollipop


Along with the numerous features HTC has included in the One M9, you also get access to a host of Android Lollipop functions that turn your phone into a truly powerful device. Here are a few features that are essential for the new smartphone owner.


Lock device access to a single app with screen pinning


If you let a friend borrow your One M9 to read an article, or if you are the type that has small children around who enjoy watching videos or playing games on any smartphone within reach, Android Lollipop has the feature for you. Screen pinning locks you phone to one app, and that app can only be exited with a special button combination combined with your security code (if you so choose).


To pin an app:


  1. Enable screen pinning by navigating to Settings > Security > Screen pinning

  2. Tap the overview (formerly multitasking) button to open your recent apps

  3. Tap the pin icon on the app you wish to pin (note: you will only be able to pin your most recently opened app, so you might need to open the app again and then return to the overview view to pin)

  4. Choose if a lock code will be required to exit the app


To exit a pinned app, simply press the overview and back buttons simultaneously and hold for a second or two.


Give notifications custom priority levels


In Lollipop, Android users can give any app that serves notifications a priority level based on how and when they want to receive alerts. To alter settings, either long-press a given notification and tap the (i) icon, or navigate to Settings > Sound & notifications > App notifications.


Your options include BlockPriority, and Sensitive, which prevent notifications from showing on the lockscreen.


Google Now and voice commands


Google Now is your personal assistant wrapped inside the One M9. It offers intelligent suggestions and feedback based on your usage habits, calendar events, and email. Google Now can serve up scores for your favorite sports teams, help you track a package, or remind you of your next meeting suggest when you will need to leave to get there on time.


To launch Google Now, press and hold the home button and drag up to the Google icon or tap the Google Search widget on your home screen. The first time you launch Google Now you will need to opt in and give it access to location data.


Beyond simply providing smart suggestions in its useful card interface, Google Now is also great for voice commands. Try asking one of the following commands:


  • How’s the weather?

  • Who is the President of the United States?

  • What bakeries are nearby?

  • What song is playing?


You can also issue direct commands:


  • Give me directions to Starbucks.

  • Remind me to take out the garbage.

  • Take a picture.

  • Play “The Beatles.”


Check out our full list of Google Now voice commands for more.


9) Improve HTC One M9 battery life


The HTC One M9 has a big enough battery to get you through the typical day, but should you find yourself in that precarious situation where no outlet is nearby and your power is dwindling, you have some options.


As with all Android Lollipop devices, the One M9 comes with a built-in battery saver mode. It will trigger automatically when your phone drops down to 15%, but it can be manually enabled by navigating to Settings > Power and flipping Power saver to the On position. An Ultra power saving mode can be enabled using the same process.


10) Get help direct from your device


one-m9-help-app_2015-04-01-12-00-15one-m9-help-app_2015-04-01-12-00-27

If you should find your device acting strange, or if you are just plain lost, help is close at hand. As in, in your hand thanks to HTC’s Help app. The app can be found in your app drawer and features a searchable database of help topics as well as troubleshooting and diagnostic tools to help you determine exactly what the issue is.


If all else fails, you can use the Help app to directly contact HTC support, even allowing them to remotely access and control your device to help you fix and lingering issues or otherwise show you how to accomplish whatever task is stumping you.


11) Visit the HTC One M9 forums


If the HTC Help app doesn’t help you find what you are looking for, we know one place that surely can: Android Forums. Our dedicated HTC One M9 forum is your go-to resource for the latest news, tips, tricks, accessory reviews, and other discussion all about HTC’s latest flagship device. Here are just a few examples of the sort of threads you will find:


Be sure to sign up for an account if you haven’t already, and head over to join in on the discussion.


Android-based Brillo OS and Weave to revolutionize The Internet Of Things [VIDEO]


Fresh off the stage from Google IO 2015, Senior VP Sundar Pichai has officially taken the wraps off Project Brillo, their new platform for the “Internet of Things.” For those that haven’t been keeping up with the term, Internet of Things (IoT) simply refers to internet connected devices which will soon reach everything in your home from light bulbs, to washer machines, door locks, and everything in between.


android-m-brillo-internet-of-things


Like how Android was for smartphones and tablets, Project Brillo looks to be Google’s underlying operating system for the IoT. It’s an end-to-end functioning operating system based on Android, only its the lowest layers of Android. This means it carries a very minimal footprint, while still providing support for things like WiFi, Bluetooth Low Energy, on tiny devices like smart light bulbs.


Android M Weave 1


Getting these devices — smartphones, appliances, light bulbs — all talking to each other properly will possible with Weave, Google’s common language for connected devices. With Weave, a camera understands a function like “lock,” or a smart door lock understands a function like “lights.”


Android M Brillo Weave 1


To wrap it all up, Google briefly showed a device running Android M and being able to recognize all these connected devices. According to Pichai, the Brillo Developer Preview will be available Q3 of 2015 and Weave Full Stack coming Q4 2015.


10 things every Samsung Galaxy S6 Edge owner should do [VIDEO]


When the Samsung Galaxy S6 Edge launched we posted 10 tips every Galaxy S6 Edge owner should know. This guide was in addition to the 50+ Samsung Galaxy S6 tips and tricks, but with a focus on the Edge Screen features. Now we’re back with a video version of these essential tips. If you own a Galaxy S6 you need to watch this video.


For the full step-by-step instructions:
10 Tips every Galaxy S6 Edge owner should know


If you’re looking for even more tips and tricks be sure to read the guide for the Galaxy S6. The Galaxy S6 Edge can do everything the regular Galaxy S6 can do, but not vice versa. Be sure to share any of your own personal tips and tricks for the Galaxy S6 Edge.


Check out the list below for even more Galaxy S6/Edge resources:


Apps in Android M only ask permission for things when they need it


google-app-permissions-io-2015


One of the rumored features of Android M was more control over app permissions, and now it has come true. Google has formally announced that Android M will allow users to have much more control over which permissions apps need.


google-app-permissions-io-2015-2


In Android M you’ll no longer see the app permissions displayed in the Play Store. Instead you’ll see apps request permissions for things as they need them. For example, if an app wants to use your camera for the first time a pop-up will ask for your permission. You’ll also be able to adjust the permissions after the fact in the settings.


whatsapp-app-permissions-io-2015


This is a big change in the way apps will be able to get permission to do things. If an app is trying to use your location and you don’t want it to you’ll easily be able to see when it tries, and then you can reject it. How do you feel about these new features?


10 things every LG G4 owner should do


LG_G4_2


If you own, or plan to own, the LG G4 you have made a decision to go against the grain. While everyone else gushes over the Samsung Galaxy S6 and HTC One M9 you’ve went with the lesser-known LG G4. We think you’ve made a really good choice. The LG G4 is a great device with a lot of unique features. In this guide we’ll show you some of those features and other things you need to do right now.


1. Set up KnockCode


G4 knock code


Security is important when it comes to smartphones. This device holds a lot of personal information, and it’s with you all the time. Android phones come with a bunch of different ways to lock your device, but the G4 has one you’ve never seen. KnockCode allows you to set up a pattern of taps to unlock your phonefle. Here’s how to do it:


  1. Go to Settings > Lock screenSelect screen lock

  2. Tap on Knock Code

  3. Tap the square 3-8 times in a pattern you can remember

  4. Tap Continue and then confirm the pattern again

  5. Next you will create a backup PIN number in case you forget the KnockCode

  6. That’s it!


When you wake up your phone you will see a square area on the lock screen for you to enter your KnockCode, but there is an even better way to do it. When the display is off you can perform your KnockCode and the display will wake up and unlock automatically, bypassing the lock screen altogether.


How to find a lost or stolen Android phone [Android 101]


2. Set up Smart Settings


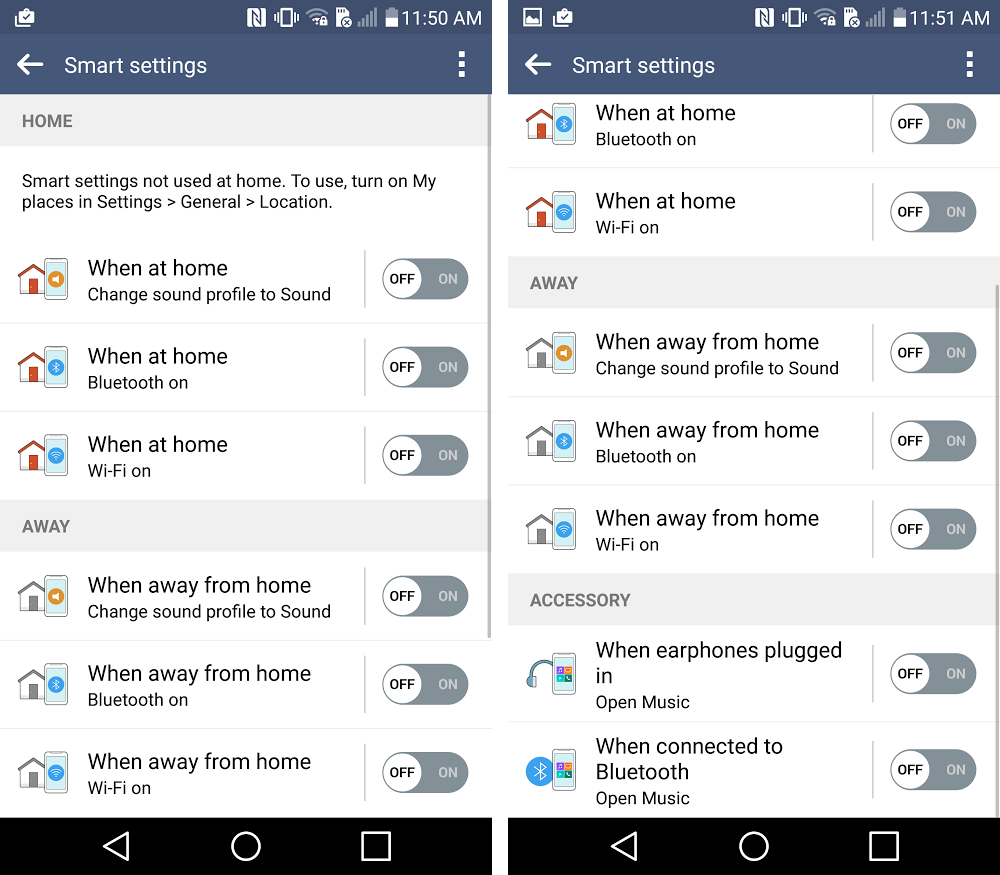
g4 smart settings


One of the new software features on the LG G4 is called Smart Settings. With this feature you can have the G4 automatically adjust settings based on your location or connected accessories. For example, when you’re at work you can have the notification sound turned off, or when you get home WiFi can automatically be enabled. It’s an incredibly handy feature you’ll want to use.


  1. Go to Settings > Smart Functions > Smart Settings

  2. You’ll see a list of toggles for “Home, Away,” and “Accessory.”

  3. Simply toggle the settings you’d like to have enabled in each section


Note: In order to use the “Home” settings you’ll have to turn on “My Places” in Settings > General > Location.


3. Download the best apps and games


Before we go any further you’re going to want some apps. Downloading apps from the Play Store is one of the first things you’re going to do, but with so many to choose from it can be daunting. How do you know which apps are the best, and how do you discover the hidden gems that most people don’t know about? The easiest way is to read from our extensive library of app guides. Here are a few you might want to check our right now.


4. Use Event Pocket


G4 event pocket


Another new software feature called “Event Pocket” can be found inside LG’s calendar app. When opened, Event Pocket will present a variety of items culled from your Facebook events or nearby points of interest, allowing you to drag and drop them directly to your calendar. For those managing an endlessly busy schedule, Event Pocket could become a useful tool.


To use Event Pocket simply tap the icon in the top right of the calendar app. You will be asked to sign into Facebook. The Event Pocket is a slide-out menu from the right side. You can drag and drop items, such as Facebook events and photos, from the slide-out menu right onto the calendar. Event Pocket will also make suggestions about local events.


5. Customize the navigation buttons


G4 nav buttons


The G4 has software navigation buttons across the bottom of the display. The benefit of software navigation buttons is the flexibility they provide. Unlike physical buttons they can disappear to make room for full screen apps, or in this case be customized to show more buttons. You can rearrange the existing buttons, or add up to two extra buttons.


  1. Go to Settings > DisplayHome touch buttons

  2. Select Button combination

  3. You can drag and drop the buttons in any order you like, but there can’t be more than 5 in the bar

  4. Changes will show up in the navigation bar immediately

  5. You can also choose the color of the buttons on the previous page


6. Create folders in the app drawer


G4 folders


Creating folders on your home screen is a good way to organize apps, but LG takes that idea one step further. With the default LG launcher you can create custom folders inside the app drawer. The app drawer is the area that shows all of your installed apps. Folders can really make it easier to find apps if you have a lot installed.


  1. On the home screen tap the app drawer icon (looks like a circle with 6 dots inside it)

  2. Tap the three-dot menu icon in the upper right corner

  3. Select View apps by and choose Custom

  4. Still in the app drawer, tap the three-dot menu icon again

  5. Select Edit/Uninstall apps

  6. Now you can drag apps on top of each other to create folders

  7. Tap the check mark in the upper right corner when you’re done

  8. Tap on the folder and tap “Folder” to rename and choose the color

  9. Done!


7. Set up Smart Notice


LG_G4_14


When you first boot up the G4 you’ll notice a big widget on the home screen with weather, date, and time. Under all that, on the same widget, is a area that shows text with a down arrow on the right side. This is LG’s “Smart Notice” widget. Smart Notice is LG’s attempt at a Google Now-like notification service that notifies you of things before you need it.


To use Smart Notice you just need to have the widget on your home screen. Tap on the settings icon in the top right corner of the widget to customize it. You’ll be able to choose if you want new card notifications, and a bunch of different options for people, time, places, and phone info. Some examples include birthdays, weather alerts, and more. It’s a nifty feature, but most people probably already have apps that do most of what it does.


8. Multi-task with floating app windows


LG-G4-QSlide


QSlide is a place where you can quickly launch apps in windows that float above whatever you’re currently doing. The QSlide apps can be re-sized, made transparent, and dragged around the screen. When you’re trying to perform multiple tasks at once the QSlide apps can be incredibly useful. There are a couple of ways to access these apps.


  1. Pull down on the notification shade and scroll through the toggles

  2. Tap on the QSlide toggle and the available apps will appear below

  3. To edit which apps appear here you can scroll to the right and tap Edit

  4. Select the app you wish to open and tap it

  5. Now you can drag it, resize by pulling the corner, and adjust transparency with the slider.


If you find yourself using these apps a lot you may want to use the second method.


  1. Go to Settings > DisplayHome touch buttons

  2. Select Button combination

  3. Drag and drop the QSlide button into the navigation bar


9. Use Dual Window mode


LG-G4-Dual-Window


If you want to take multi-tasking to the next level you can use Dual Window mode. You can run two apps at the same time on each half of the display. Dual Window mode doesn’t work with all apps, but new for the G4 is Google Docs, Sheets, and Slides. Other apps include YouTube, Chrome, Hangouts, Gmail, Messaging, and more. Here’s how to use it.


  1. Long-press the Back button

  2. Select the app to display on top

  3. Select the app to display on the bottom


Another way to do this is to press the Recents button and select Dual window. When Dual Window mode is active you can drag the divider between the apps to resize the windows. To close one of the apps you can simply drag the other app to full screen.


10. Open apps quickly with the volume buttons


LG_G4_16


One of the most iconic features of LG phones has become the infamous buttons on the back of the phone. No one else is putting buttons on the back of phones, and it really does make a lot of sense. LG takes advantage of these buttons to perform a few tasks besides just adjusting the volume. You can use them to quickly launch the camera or take notes when the display is off.


  1. Go to Settings > Shortcut key

  2. Switch the toggle to On


Double tapping Volume Up will launch the QMemo app for taking notes. Double tapping Volume Down will quickly launch the camera. On that same page in the settings you can choose to have the camera automatically take a photo as soon as it’s launched from the shortcut.


Now that you’ve got the basics nailed, check out 35+ more LG G4 Tips & Tricks


Bonus: Explore the LG G4 forums


If you’re already an owner of a LG G4, or you plan to buy one when they release, you can join the LG G4 forum over at Android Forums. You’ll find conversations about customization, troubleshooting problems, accessories, and much more. It’s the best place to go to ask questions and learn more about your new phone. Here are a few threads you may be interested in: