We’ve already shown you the first 13 things you should do when getting your Samsung Galaxy S6, and all of that is equally applicable to the Samsung Galaxy S6 Edge. If you picked up the Edge and were wondering about its unique features, though, look no further. Here’s a full rundown of everything you should know about the Edge display and all the options, features and settings at your disposal.
1. Set the device to light up the Edge screen when calls or messages are received
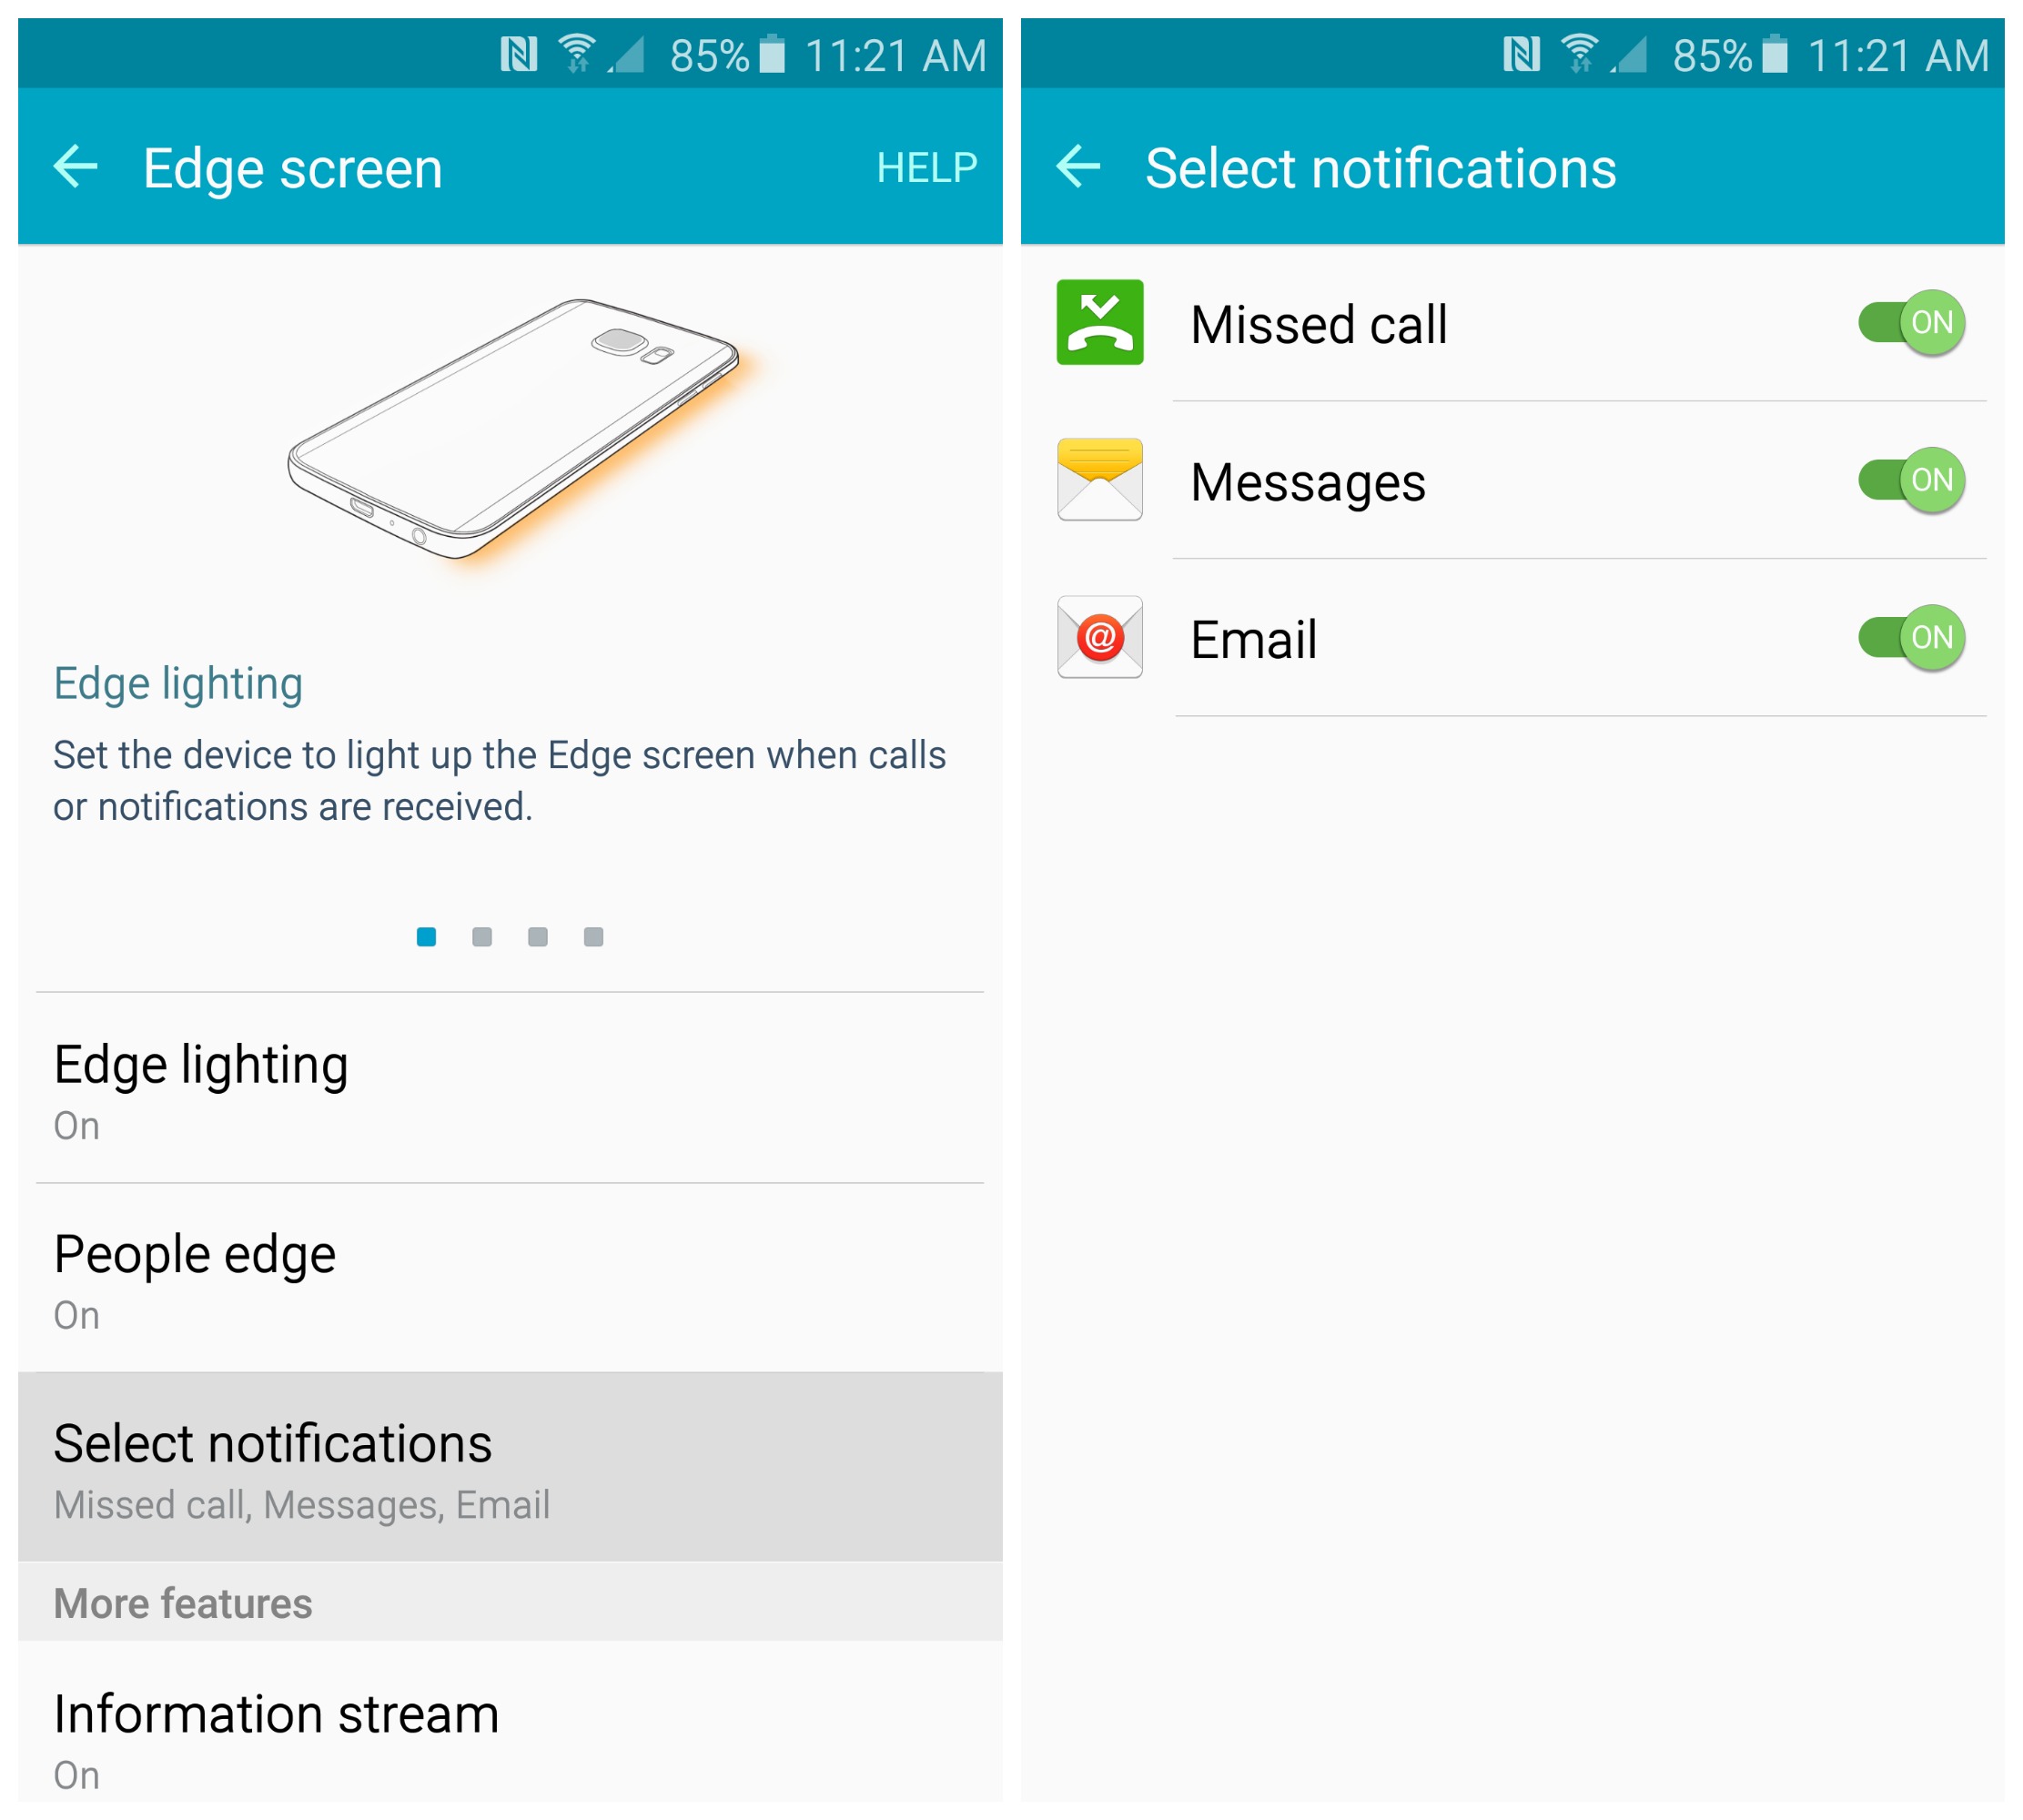
One of the main features of the Samsung Galaxy S6 Edge’s Edge display is to have it illuminate a certain color based on who’s calling or messaging you. You’ll probably want to get this setup as soon as you receive your phone. Simply head to Settings > Edge screen > Edge lighting and make sure the option is set to “On,” and you’re good to go!
2. Pick 5 of your most important people to light up your Edge display
Of course, setting up the Edge display isn’t worth much without actually specifying which contacts you want lighting up your desk. Going to Settings > Edge screen > People edge will allow you to do just that.
Alternatively, on the home-screen you can slide out the People edge user interface by swiping the transparent tab to the middle of the display, and use the “+” icon to add any contact you want.
Now you can set up to 5 contacts that will illuminate your Edge display whenever they call (as well as other Edge features which we’ll get to in a moment). You can pick from one of 5 colors for those contacts:
Blue
Green
Yellow
Orange
Purple
Setting up your people isn’t enough, though — you’ll need to make sure your phone knows which phone numbers and email addresses to look for whenever they reach out.
3. Set default contact information for People edge
Heading to Settings > Edge Screen > People edge will allow you to specify default contact options for each of your five contacts.
You won’t be able to get notifications from them until you set these up, so make sure you don’t skip this step! Setting an email address will naturally enable Edge notifications for when they send you email, while setting the default phone number enables them for both phone calls and messages. Note that this information will need to be entered into each contact’s listing in your Contacts app before it shows up as a default option in People edge, so be sure to double check that if you aren’t seeing the options you’re looking for.
Once you’ve gotten it all ready to go you’ll notice your Edge display glow in the color corresponding to each contact whenever they call or message you. Be sure to set your phone face down on the surface to get the most out of this cool effect!
4. Send Quick Replies to your Edge contacts using the heart rate sensor
You only get the most out of the Edge display notifications when your phone is face down, so how do you act on incoming calls and messages without having to pick the phone up? Simple: the Heart Rate sensor on the rear does more than just read your pulse — it can be used to send quick replies!
To enable the feature and set your message, go to Settings > Edge Settings > Quick Reply and make sure the option is set to “On.” After that, use the text box at the bottom to set a custom message you want to send to a contact whenever you can’t accept their call.
When you have an incoming call from an Edge contact and can’t be bothered to pick the phone up, simply touch the heart rate sensor with your finger for 2 seconds and it’ll dismiss the call and send your preset text message to let them know you aren’t able to come to the phone.
5. Pull on your contacts’ colors to see and respond to missed calls and messages
Once you’ve gotten your People Edge contacts setup, you’ll see little tabs with their colors when you miss a call or message from them on your home-screen. Pulling on these tabs will not only show you information about the event — such as the contents of the message or the time the missed call was placed — but also allow you to respond to them. Envelope icon is for email, phone icon is to call, and the chat bubble icon is to send a text message. Easy peasy.
6. Get news, weather and Twitter updates on the Edge display
The Edge screen is informative in more ways than one, including being your very own news ticker. The Information Stream can be customized by going to Settings > Edge Settings > Information Stream, and it’s here where you can sync your Twitter account to get updates when new Tweets come in, sports scores and news, weather information and stock quotes.
You can also use the “Manage Feeds” option to download more types of feeds. They’ll automatically display when new information comes in, though you can also force the feed to come up by swiping your finger to the left or right across the Edge display.
Here are the different types of streams you can setup by default:
Briefing feed (standard device and app notifications)
Yahoo! News
Twitter trends
Yahoo! Finance
Yahoo! Sports
There are also a number of additional types of feeds you can download:
RSS Feeds for Edge
Whoscall – Caller ID & Block
BILD Newsticker
Be sure to explore each one and set them up to your own taste and liking!
7. Show a night clock on the Edge screen at night
One cool thing you might not know about the Edge display is that it’s possible to use it as a night clock! The time will display in low illumination at night, and thanks to the AMOLED display’s ability to turn on only the pixels it needs it sips next to nothing from the battery.
The only problem is you’ll need to enable this feature as it’s not enabled by default, though that’s no big task. Venture to Settings > Edge screen > Night clock and make sure the setting is set to “On.” From there, you can use the controls to specify a block of time when the night clock is enabled, up to a maximum of 12 hours.
8. Set a primary side for all your Edge display features to show on
We’re all different from head to toe, and that includes which hand we’re most comfortable using our phones with. If you don’t fancy your Edge features showing up on the righter-most edge, you can set it up on the left one. To do this, just go to Settings > Edge Screen > Edge Screen Position and select either Right Side or Left Side depending on what you fancy.
9. Have your Edge screen automatically shut off after a certain amount of time
As cool as the Edge display is, it can’t be on 24 hours per day and 7 days per week, lest you want your battery to run as dry as an overused well. While you can’t disable Edge screen timeout all together, you’ll be happy to know that you have some control over how long it takes for your display to shut off. Head to Settings > Edge Screen > Edge Screen Timeout and select from these preset options:
15 seconds
30 seconds
1 minute
2 minutes
5 minutes
15 minutes
We’d recommend only using the latter half of that list of options in the most extreme cases, but it’s yours to customize, so go nuts!
10. Get more help at the Samsung Galaxy S6 Edge forums
So where to from here? Our Samsung Galaxy S6 Edge section at AndroidForums.com is a great destination for help, tips and trick and other helpful discussion, such as where to find the best cases, screen protectors, wireless chargers and other accessories. Here are just a few of the threads filled to the brim with conversation right now:
Got your Samsung Galaxy S6 today or planning to receive it in the very near future? We know you’ll want nothing more than to rip all the plastic off of it and go to town, and once you dive in you’ll find that there’s so much to see, do and customize that you’ll probably want to put it down for a couple of minutes.
But there’s no need to spend hours digging for the coolest features and options if you’re in a rush — we’ve already done that for you, and we’ve laid out more than 50 of the best tips and tricks for the Samsung Galaxy S6 right here.
These tips and tricks will mostly be applicable from the moment you boot your phone up, but you may need to setup your Samsung account for a few of them. You’ll have taken care of most of that if you’ve followed our first 13 things to do for the Samsung Galaxy S6 (as well as 10 Samsung Galaxy S6 Edge tips and tricks for those of you with the cool Edge variant), so be sure to give that a gander if you haven’t already. Without further ado, let’s go!
Video:Watch this sampling of 40 tips and tricks in 12 minutes!
Getting Started
Take a screenshot on the Samsung Galaxy S6
One of the most common questions people ask when they get a new phone is “how do I take a screenshot?” There are two ways to do it with the Galaxy S6.
Press and hold the Home and Power buttons simultaneously
Swipe your palm across the entire display to take a screenshot
Once a screenshot is taken you will see it in your notification bar. From there you can share or edit it to your hearts content.
Buy a wireless charger for your Samsung Galaxy S6
The Galaxy S6 is one of a growing number of devices that support wireless charging. You don’t have to worry about plugging in your device or accidentally ripping the cord out of the wall. All you have to do is set it on a charging pad. The Galaxy S6 supports both wireless charging standards, so any wireless charging pad will work with it. Here are a few of our favorites:
…or use a wall charger for its awesome Fast Charge feature
There is a benefit to using the old fashioned charging cable. The Galaxy S6 supports Qualcomm Quick Charge 2.0. This technology allows you to get hours of use from just 10-15 minutes of charging. You don’t have to do anything special for this to work. Just use the the wall charger that came with the phone. You’ll see a notification when Fast Charge is working.
You should also know that any wall charger with Quick Charge 2.0 will work with the Galaxy S6. Amazon is selling a bunch of different versions if you want to grab some extras.
Claim your free 100GB of OneDrive Storage
One of the perks of owning the Galaxy S6 is 100GB of free storage for Microsoft OneDrive. If you’ve never used OneDrive it’s actually a really nice service. When you set up your phone for the first time you will be asked to sign in or create a OneDrive account. If you already did that you should have the free 100GB of storage.
If you skipped that step you can open the OneDrive app and take advantage of the deal. All you need to do is sign in or create an account. You can take it a step further and have OneDrive automatically backup your photos and videos. Find out how to do that in our guide for first things to do with the Galaxy S6.
Setup “Do Not Disturb” to silence your phones at certain times
Samsung has renamed the Lollipop priority notification system to “Do Not Disturb.” With these settings you can control when you get notifications. To get started go to Settings > Sounds and notifications.
If you turn on Do not disturb mode there is an option to allow exceptions. If you don’t allow any exceptions the phone will be completely silent (not even alarms will break through). Your best bet is to add exceptions for alarms, certain numbers, and important apps. You can also set up a schedule to automatically enable Do not disturb at a specific time every day.
Reboot your phone without removing the battery
Samsung decided to go with a non-removable battery in the Galaxy S6. Not only does this mean you can’t swap out batteries for extra juice, but you also can’t remove the battery if your phone freezes. You can still reset your phone without having to remove the battery.
A soft reset will restart your phone without erasing any data. Press and hold the Power and Volume Down buttons for 10 seconds until the device powers off.
Use the new Smart Manager app to run maintenance on your phone
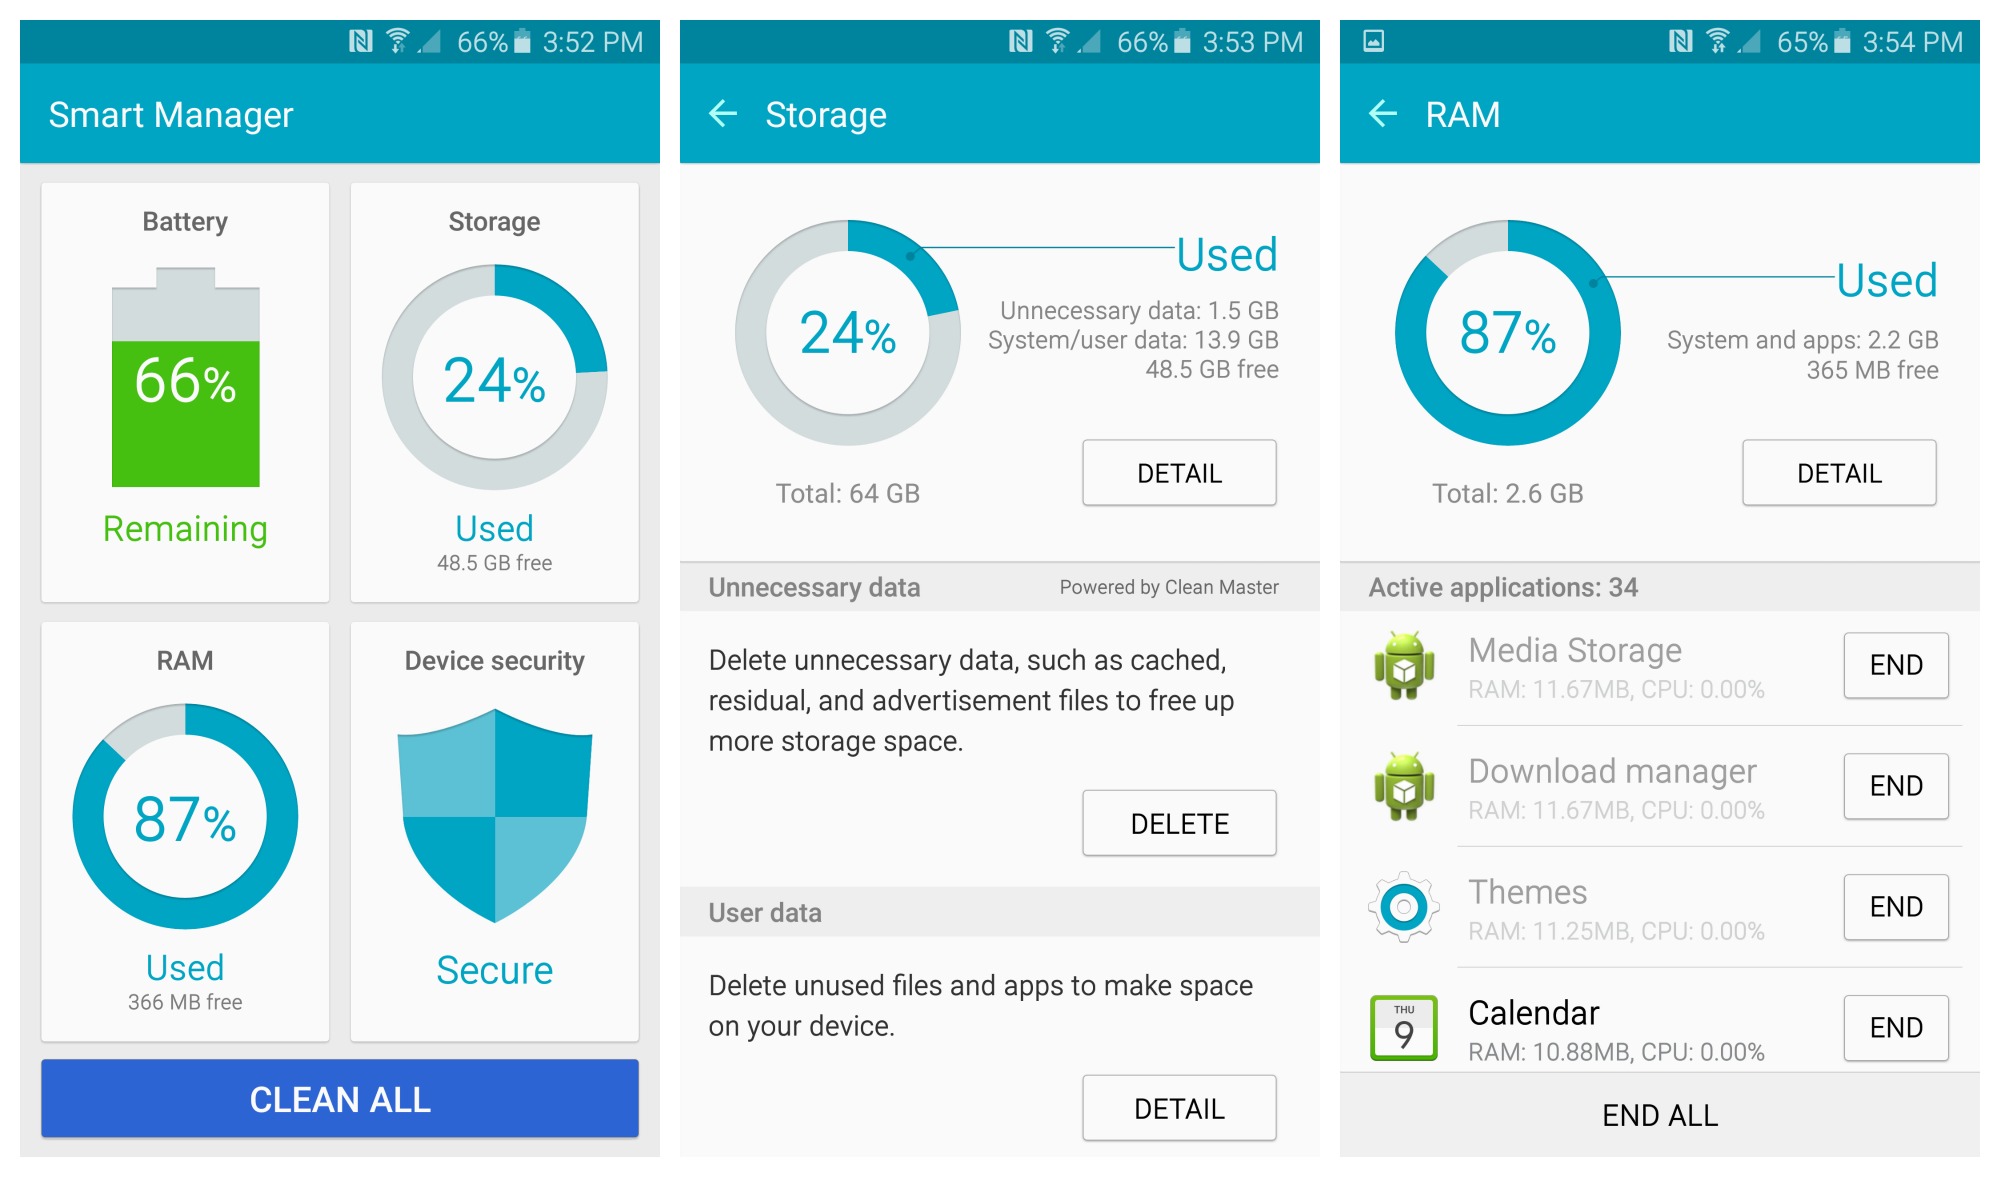
The Galaxy S6 comes with a new Samsung app called Smart Manager. With this app you can manage the performance, security, and battery. All of the features in Smart Manager were present on earlier devices, but now they are all in one place. When you open the app there are four sections: Battery, Storage, RAM, and Device security. Let’s look at each one.
Battery
In the Battery section you will see estimated time left for remaining power and the option to turn on one of the power saving modes. There’s also a section that shows which apps are using the most battery so you can disable them.
Storage
In this section you will find information about what things are taking up the most storage. You also have the option to clean the device and get rid of unnecessary data.
RAM
Here you will find out which apps are consuming the most RAM. You can “End All” apps at once free up memory, or kill them individually. We don’t recommend killing all the apps often.
Device security
The last section is all about security. You can see if there are any unauthorized system changes and enable the KNOX app if you want to use your phone for work. There are also some anti-malware features powered by McAfee.
Enable Ultra Power-Saving mode to squeeze even more juice out of your battery
Ultra Power Saving Mode can help you get every last drop of battery life. When this mode is enabled it switches the phone to a black and white interface and disables most background activities. You’ll still be able to take calls, send messages, and use a few important apps. Configure it in Settings > Battery > Ultra power saving mode.
There is also the less extreme Power Saver Mode. When this mode is enabled the screen brightness will turn down and the processor will scale back. You can set Battery Saver to automatically turn on at any level between 50-15%. Configure it in Settings > Battery > Power saving mode.
Enter “Easy Mode” if the default experience is too advanced for you
If he default experience is too advanced for you, or if you want to lend your phone to someone not very good with technology, Easy Mode can be a big help. In Easy Mode you’ll see just a couple of big app icons, and an area to add favorite contacts.
Open Settings and go to Personalization
Select Easy mode
You can choose between Standard mode and Easy mode
You can also choose which apps you’d like to show up in Easy Mode
Gestures
Enable Smart Stay to keep your display on while you’re looking at it
Smart Stay is one of the more ingenious features Samsung has ever created. With this feature enabled your Galaxy S6 will stay on as long as you are looking at the display. No more annoying screen turn-offs while reading a web page, or Netflix continuing to play after you fall asleep. Smart Stay is turned off by default; here’s how to turn it on.
Go to Settings > Display
Select Smart Stay and make sure it’s enabled
Note: Smart Stay does not work in the dark.
Use Smart Alert to know if you missed a call or message when picking your phone up
If you have missed calls or new messages the Galaxy S6 can vibrate when you pick it up. This feature is called “Smart Alert,” and it’s enabled by default. If you would like to toggle this feature go to Settings > Motions and gestures.
Move the phone to your ear while messaging someone to call them
Another nifty gesture is “Direct Call.” This feature allows you to directly call someone by bringing the phone up to your ear if you’re on their contact page or a messaging conversation. For example, if you’re texting someone and you want to call them just put the phone to your ear. This can also be toggled at Settings > Motions and gestures.
Set your phone face down while it’s ringing to mute it
To quickly mute the Galaxy S6 when you’re getting a call you can do two gestures. Simply place your hand flat on the display, or turn it over on it’s face. This also works as a way to dismiss alarms. This can also be toggled at Settings > Motions and gestures.
Customization
How to remove Flipboard Briefing from your homescreen
On the Galaxy S5 there was a special section of the home screen called “My Magazine.” This section is still present on the Galaxy S6, but it has been renamed to “Briefing.” It basically just aggregates news stories from a number of different sources. The idea sounds cool, but the interface is a little laggy. You should remove it.
Long press on the home screen
Scroll over to the Briefing panel on the far left
Uncheck the checkbox at the top
If you really do like the Briefing feature we recommend downloading the Flipboard app. The Briefing panel is actually powered by Flipboard, so you get a similar interface, but it runs much smoother in its own app.
Add more home screen panels of your own
You can have up to 7 different pages (or panels) to hold your apps and widgets on the home screen. Here’s how to customize the order and amount.
Tap and hold a blank space on the home screen to add, move, or remove a panel
To add a panel, swipe to the left, and then tap [+] icon
To move a panel, tap and hold a panel, and then drag it
To remove a panel, tap and hold a panel, and then drag it to Remove at the top of the screen
To set a panel as the main home screen, tap the Home icon in the screen indicators
Get more icons on your home screen
To make more room for apps and widgets on your home screen you can edit the grid size. By default it’s 4×4, but you can change it up to 5×5.
Tap and hold a blank space on the home screen
Tap on Screen grid and choose 4×4, 4×5, or 5×5
Use the “edit” button in the notifications pane to customize your Quick Toggles
Samsung includes a ton of Quick Setting toggles in the notification shade by default. You can access these by swiping down from the top of the display. You can edit the order of these toggles, or remove some completely. If you use these toggles a lot (which you should), a quick edit now will make your life easier.
Pull down the Quick Settings and tap EDIT in the top right corner
From here you can drag the toggles around as you like
There must be at least 5 toggles in the Quick Settings
Download and switch between Samsung Galaxy S6 Themes
The Galaxy S6 comes with the ability to choose themes that can change your wallpaper, icons, and even system apps and UI. They’ve included a bunch of themes that you can try out and use on your device. It’s easy to give your phone a completely new look.
Open the Themes Store app
Browse the themes and select one you like
Tap on Download
Now you can select Apply and it will take you to your new home screen
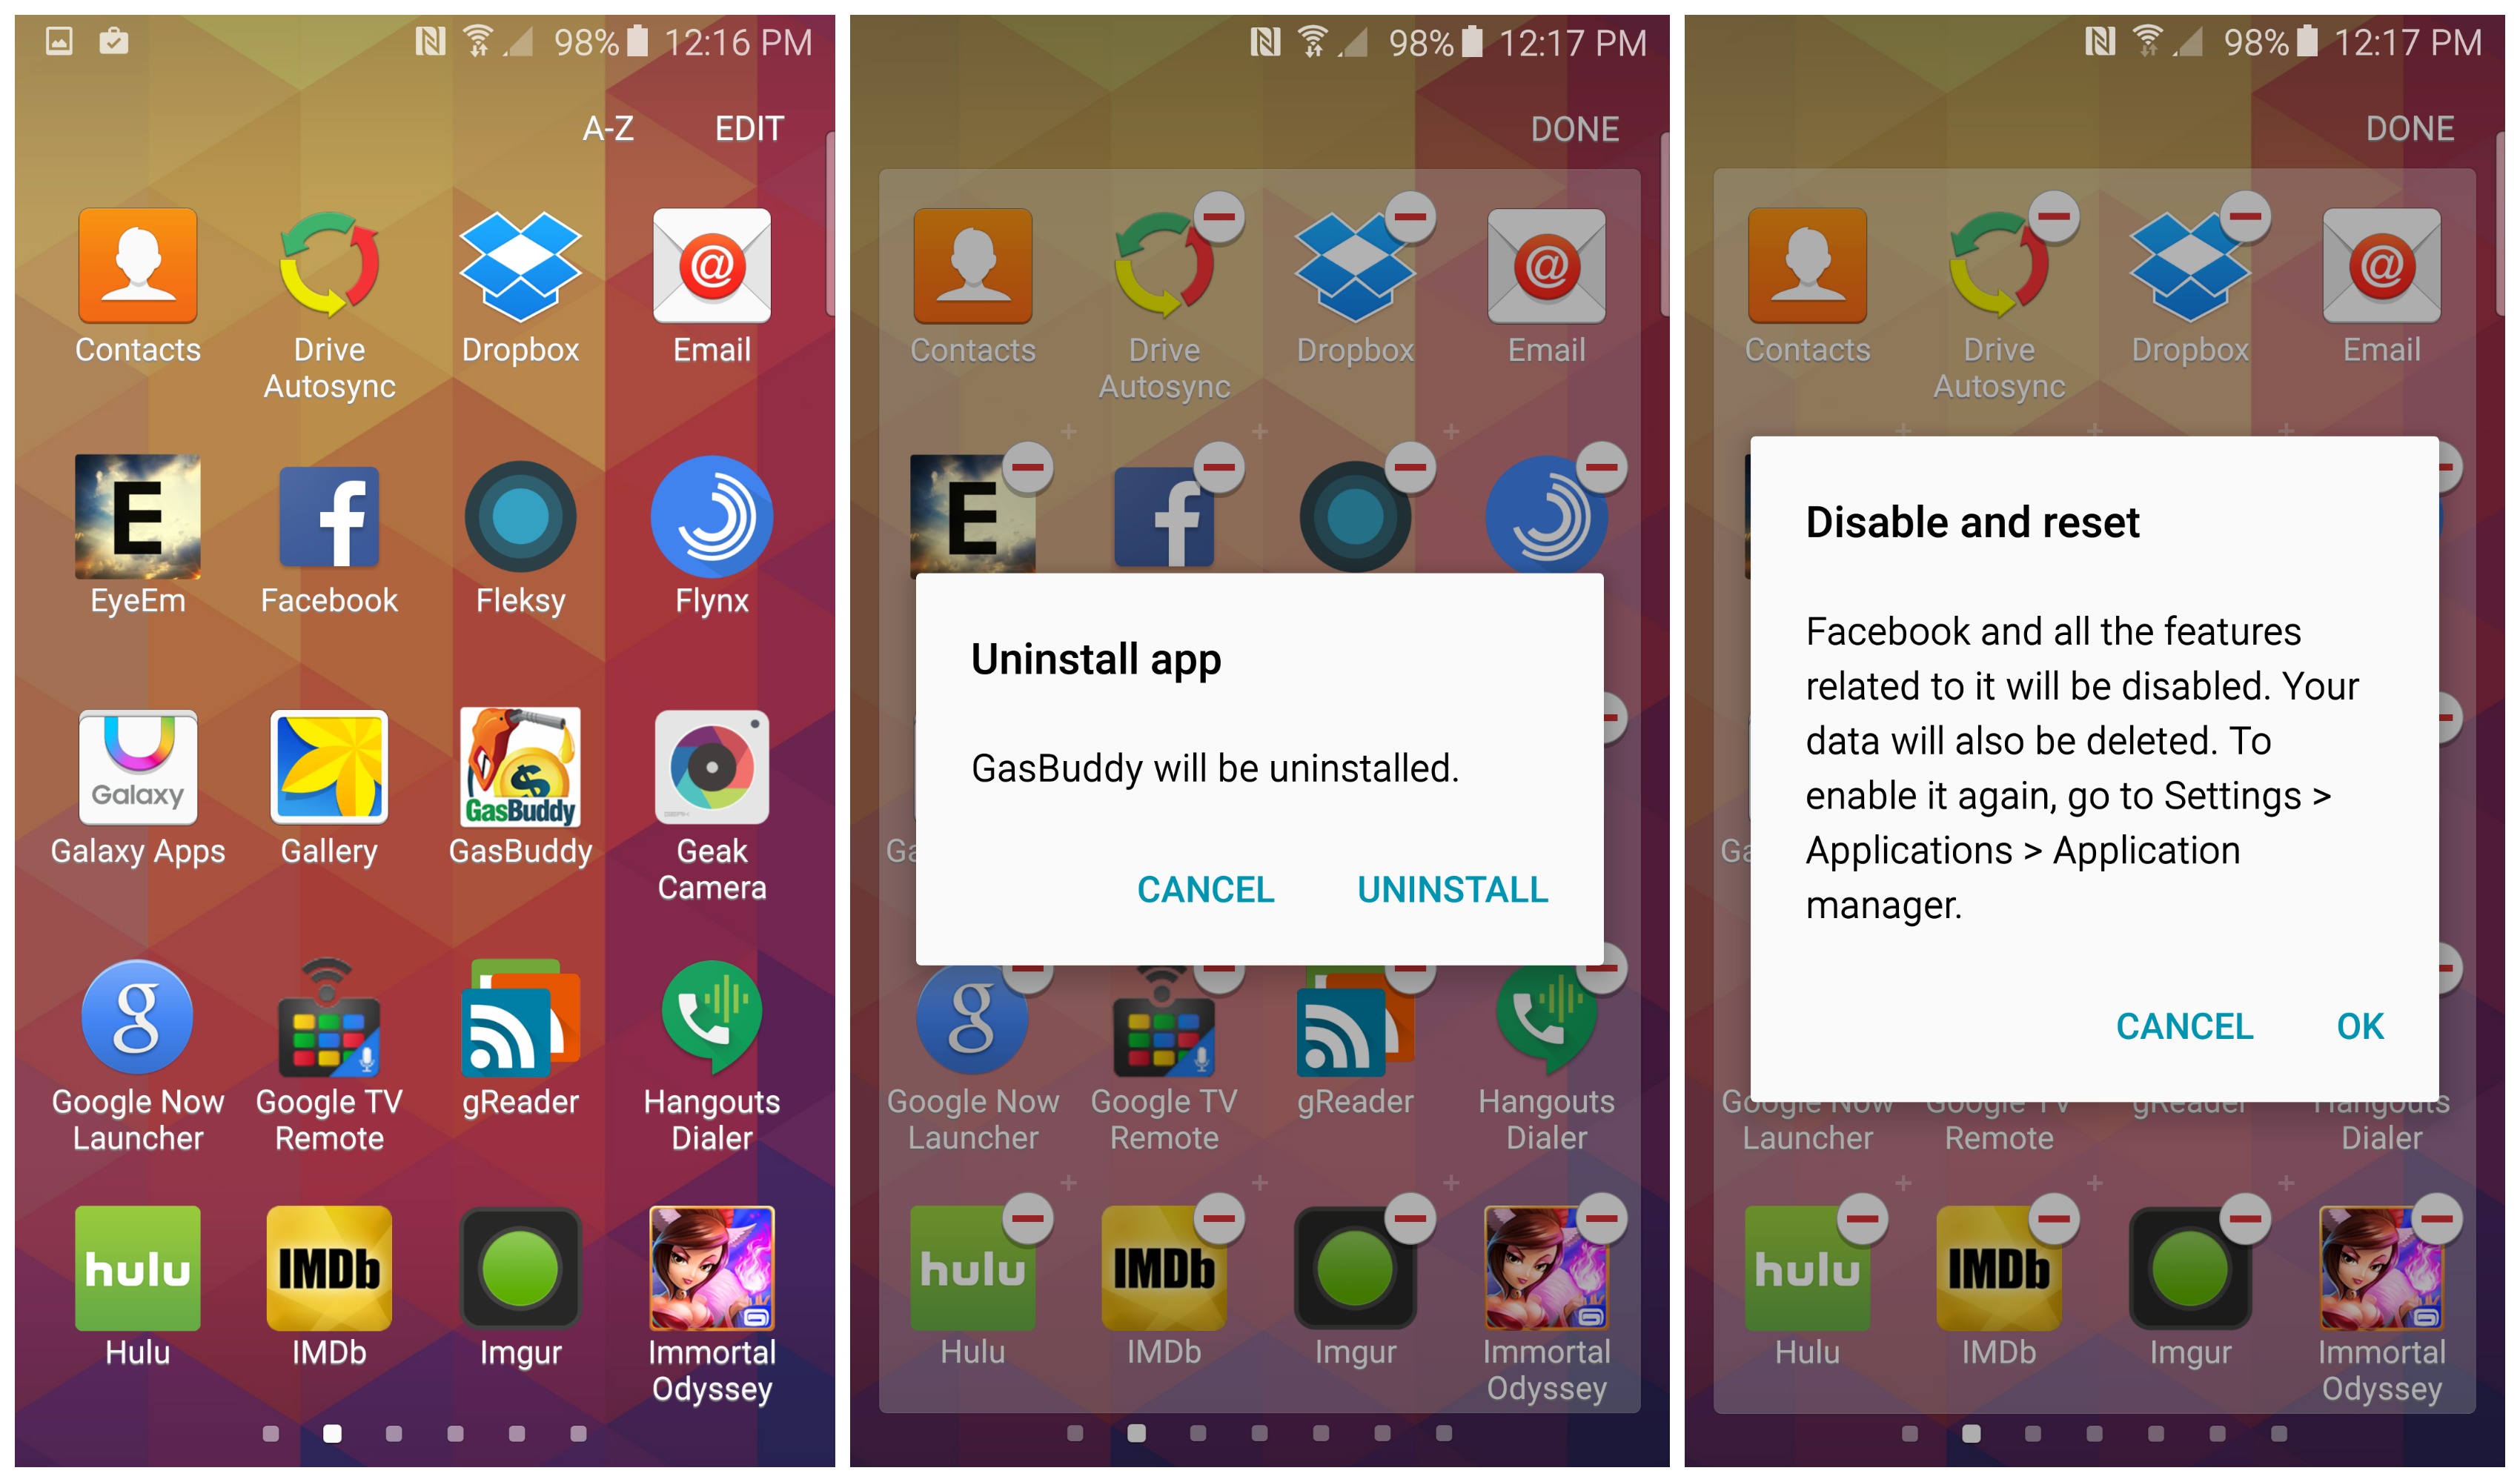
Disable or remove unwanted apps
Samsung used to be notorious for including a lot of bloatware on their devices. There are still a few apps on the Galaxy S6 that can be considered bloat, but it’s a little better.
It was first rumored that it would be possible to uninstall all pre-loaded apps. That wasn’t entirely true. Some system apps can be uninstalled, but others can only be disabled. A disabled app won’t appear in your app drawer and won’t be able to run in the background, but it will still be present on the device.
Open the app drawer and tap the edit button
Minus icons will appear on any app that can be uninstalled or disable
Tap the minus icon on the apps you wish to remove
Some of the apps you might want to uninstall/disable include Hancom Office 2014, Microsoft OneNote, Lookout, Milk Video, Milk Music, and carrier specific apps.
Change your screen mode for a better viewing experience
Samsung has included a few different screen modes to allow you to easily adjust colors and brightness. You can switch the screen mode by going to Settings > Display > Screen mode.
Adaptive display: tires to adjust based on what you’re doing with the phone.
AMOLED cinema & AMOLED photo: vivid and highly saturated colors.
Basic: not overly saturated or bright. Just basic.
Basic is the best setting for most people. It will look dull at first as you transition from the other more vivid settings, but it’s actually the most true-to-life.
Enable swipe input on the Samsung keyboard
By default Samsung does not enable swipe input on the keyboard. Swipe input allows you to drag your finger over letters to type a word. It can be very useful, especially for one-handed use. You should enable it.
Go to Settings > Language and input
Select Samsung keyboard
Tap Keyboard swipe
Select Continuous input
Now to type a word just drag your fingers across the letters in order.
Multi-tasking
Use two apps at the same time using the Recent Apps menu
Multi-window mode allows you to run two different apps simultaneously on the same screen. Samsung has made multi-window mode much easier in the Galaxy S6. It’s now built right in to the recent apps menu.
Tap the physical “Recents” button to the left of the Home button
All your recent apps will show up on the screen like a Rolodex
Apps that can be used in multi-window will show a twin rectangle icon next to the (X) in the right corner
Tap that icon to open the app in the top half of the screen
The lower half of the screen will now show only recent apps that can used in multi-window mode
Tap one to open it in the lower half
You can re-size the apps by dragging the middle line
Get your files faster using Download Booster
Are you tired of waiting for large files to download? Samsung has just the thing! A new feature called Download Booster will help you download large files in record time. It works by using a combination of WiFi and LTE to download files.
Go to Settings > More connection settings
Select Download booster and toggle it on
Use S Finder as a one-stop search for every app, file or contact on your device
S Finder is an app that helps you find things on your Samsung phone. It can search for apps, files, photos, music, contacts, and more. Some versions of the Galaxy S6 include a button for S Finder under the brightness slider in the notification shade. If that’s not there on your version you can still launch it from the Quick Settings toggles. Just open it and start typing to see results.
Never forget about another notification with Notification Reminder
If you get a lot of notifications you may forget to respond to some of them. Notification Reminders can remind you to take action on past notifications. Your phone will make a noise after a certain amount of time if there is a notification that really needs your attention.
Go to Settings > Accessibility > Notification reminders
Here you can set up the reminder intervals for 15 sec, 30 sec, 1 minute, 3 minutes, and 5 minutes.
By default every app is included, but you can turn of the ones you don’t want to be reminded about
Save time typing by adding keyboard shortcuts
If you find yourself typing out long words or phrases a lot, such as email addresses, you might want to create a text shortcut. This will allow you to quickly insert a long word or phrase by just typing a few letters. For example, you could make “ilu” automatically correct to “I love you.” Here’s how:
Go to Settings > Language and input
Select Samsung keyboard
Tap on Text shortcuts
Tap ADD to create your own shortcut
Send files to other Galaxy users easily with Quick Connect
There are a plethora of ways to send files to other people, but Samsung devices have a special one called Quick Connect. This feature allows you to quickly find nearby devices and send stuff to them. When the feature is enabled Bluetooth will automatically turn on.
Swipe down the notification shade and find Quick Connect
When you tap Quick Connect a list of nearby devices will show up. Tap one
Now select the type of file you’d like to send
After you select a file you will have to wait for the other device to accept
The file will begin to transfer
Camera Tips and Tricks
Quick launch the camera right from anywhere by double tapping the Home button
Self explanatory in the title, there: double tap that home button no matter what you’re doing on your Samsung Galaxy S6, and the camera is ready for you to snap photos or video in 7/10ths of a second. You can enable this by going into the Camera app’s Settings menu and finding the Quick Launch setting.
Use Tracking AF to keep the focus on your subject
Samsung added a new autofocus mode called Tracking AF. It’ll allow you to pre-focus on a subject before snapping photo or video, and will attempt to keep that subject in focus if they happen to move. This feature works with not only faces, but ANY object you want to focus on ahead of taking the shot.
To enable it, head into the Camera app’s Settings menu and switch the Tracking AF option to “On.”
Immediately review your photos as soon as you take them
It can be annoying to snap a photo and have to click around the interface to see how it came out. Instead of doing all that you can have the phone automatically bring a preview up for you to check out and either keep or delete it before moving on to your next shot. Just go into the Camera app’s Settings menu and enable the “Review Pictures” option.
Capture photos or videos using voice commands
Instead of using awkwardly-placed on-screen buttons to snap a photo, you can use your voice. Not only does it help you keep the camera steady for the perfect shot, but it can be fun to get your subject (or subjects) to join in.
Head into the Camera’s Settings menu and find the option to toggle voice commands on or off. Here are the various voice commands you can use to snap a shot:
Smile
Cheese
Capture
Shoot
Record Video
Use the volume key to zoom, snap a photo or shoot video
If you do prefer a hands-on approach to shuttering, you can have the camera recognize your volume rocker as a physical shutter button. You can change its behavior in the Camera app’s Settings menu under Volume Key Function, and set the rocker to either zoom in or out, snap a photo or begin recording video. You can also turn it off if you want the volume button to retain normal functionality.
Take selfies the easy way using the heart-rate sensor, or by waving your hand
All of that is useful for the rear camera, but what about making it easier to take selfies? You have a couple of cool options at your disposal. The first allows you to take a selfie by holding your finger on the heart rate sensor for 2 seconds.
You can also wave your hands in front of the camera to initiate a countdown timer to snap your selfie. This eliminates the need to use your second hand to take a photo, which is often the number one cause for subpar selfies. Yes, there’s a science to this stuff, folks.
Use Pro Mode Presets to adjust ISO, exposure and focus
Samsung prides themselves on great cameras with their smartphones, so including a Pro Mode with the Samsung Galaxy S6 was a must. This mode lets you fine tune your camera’s settings with the ability to change white balance, exposure correction, metering, ISO, and focus modes, all of which can be had by pressing the “Modes” button that you’ll find in the camera user interface.
To go a step further, you can even set presets for a certain configuration that you like, so the next time you need that collection of settings you can simply switch to it with one press of a button. Play around with it to see what works best for you!
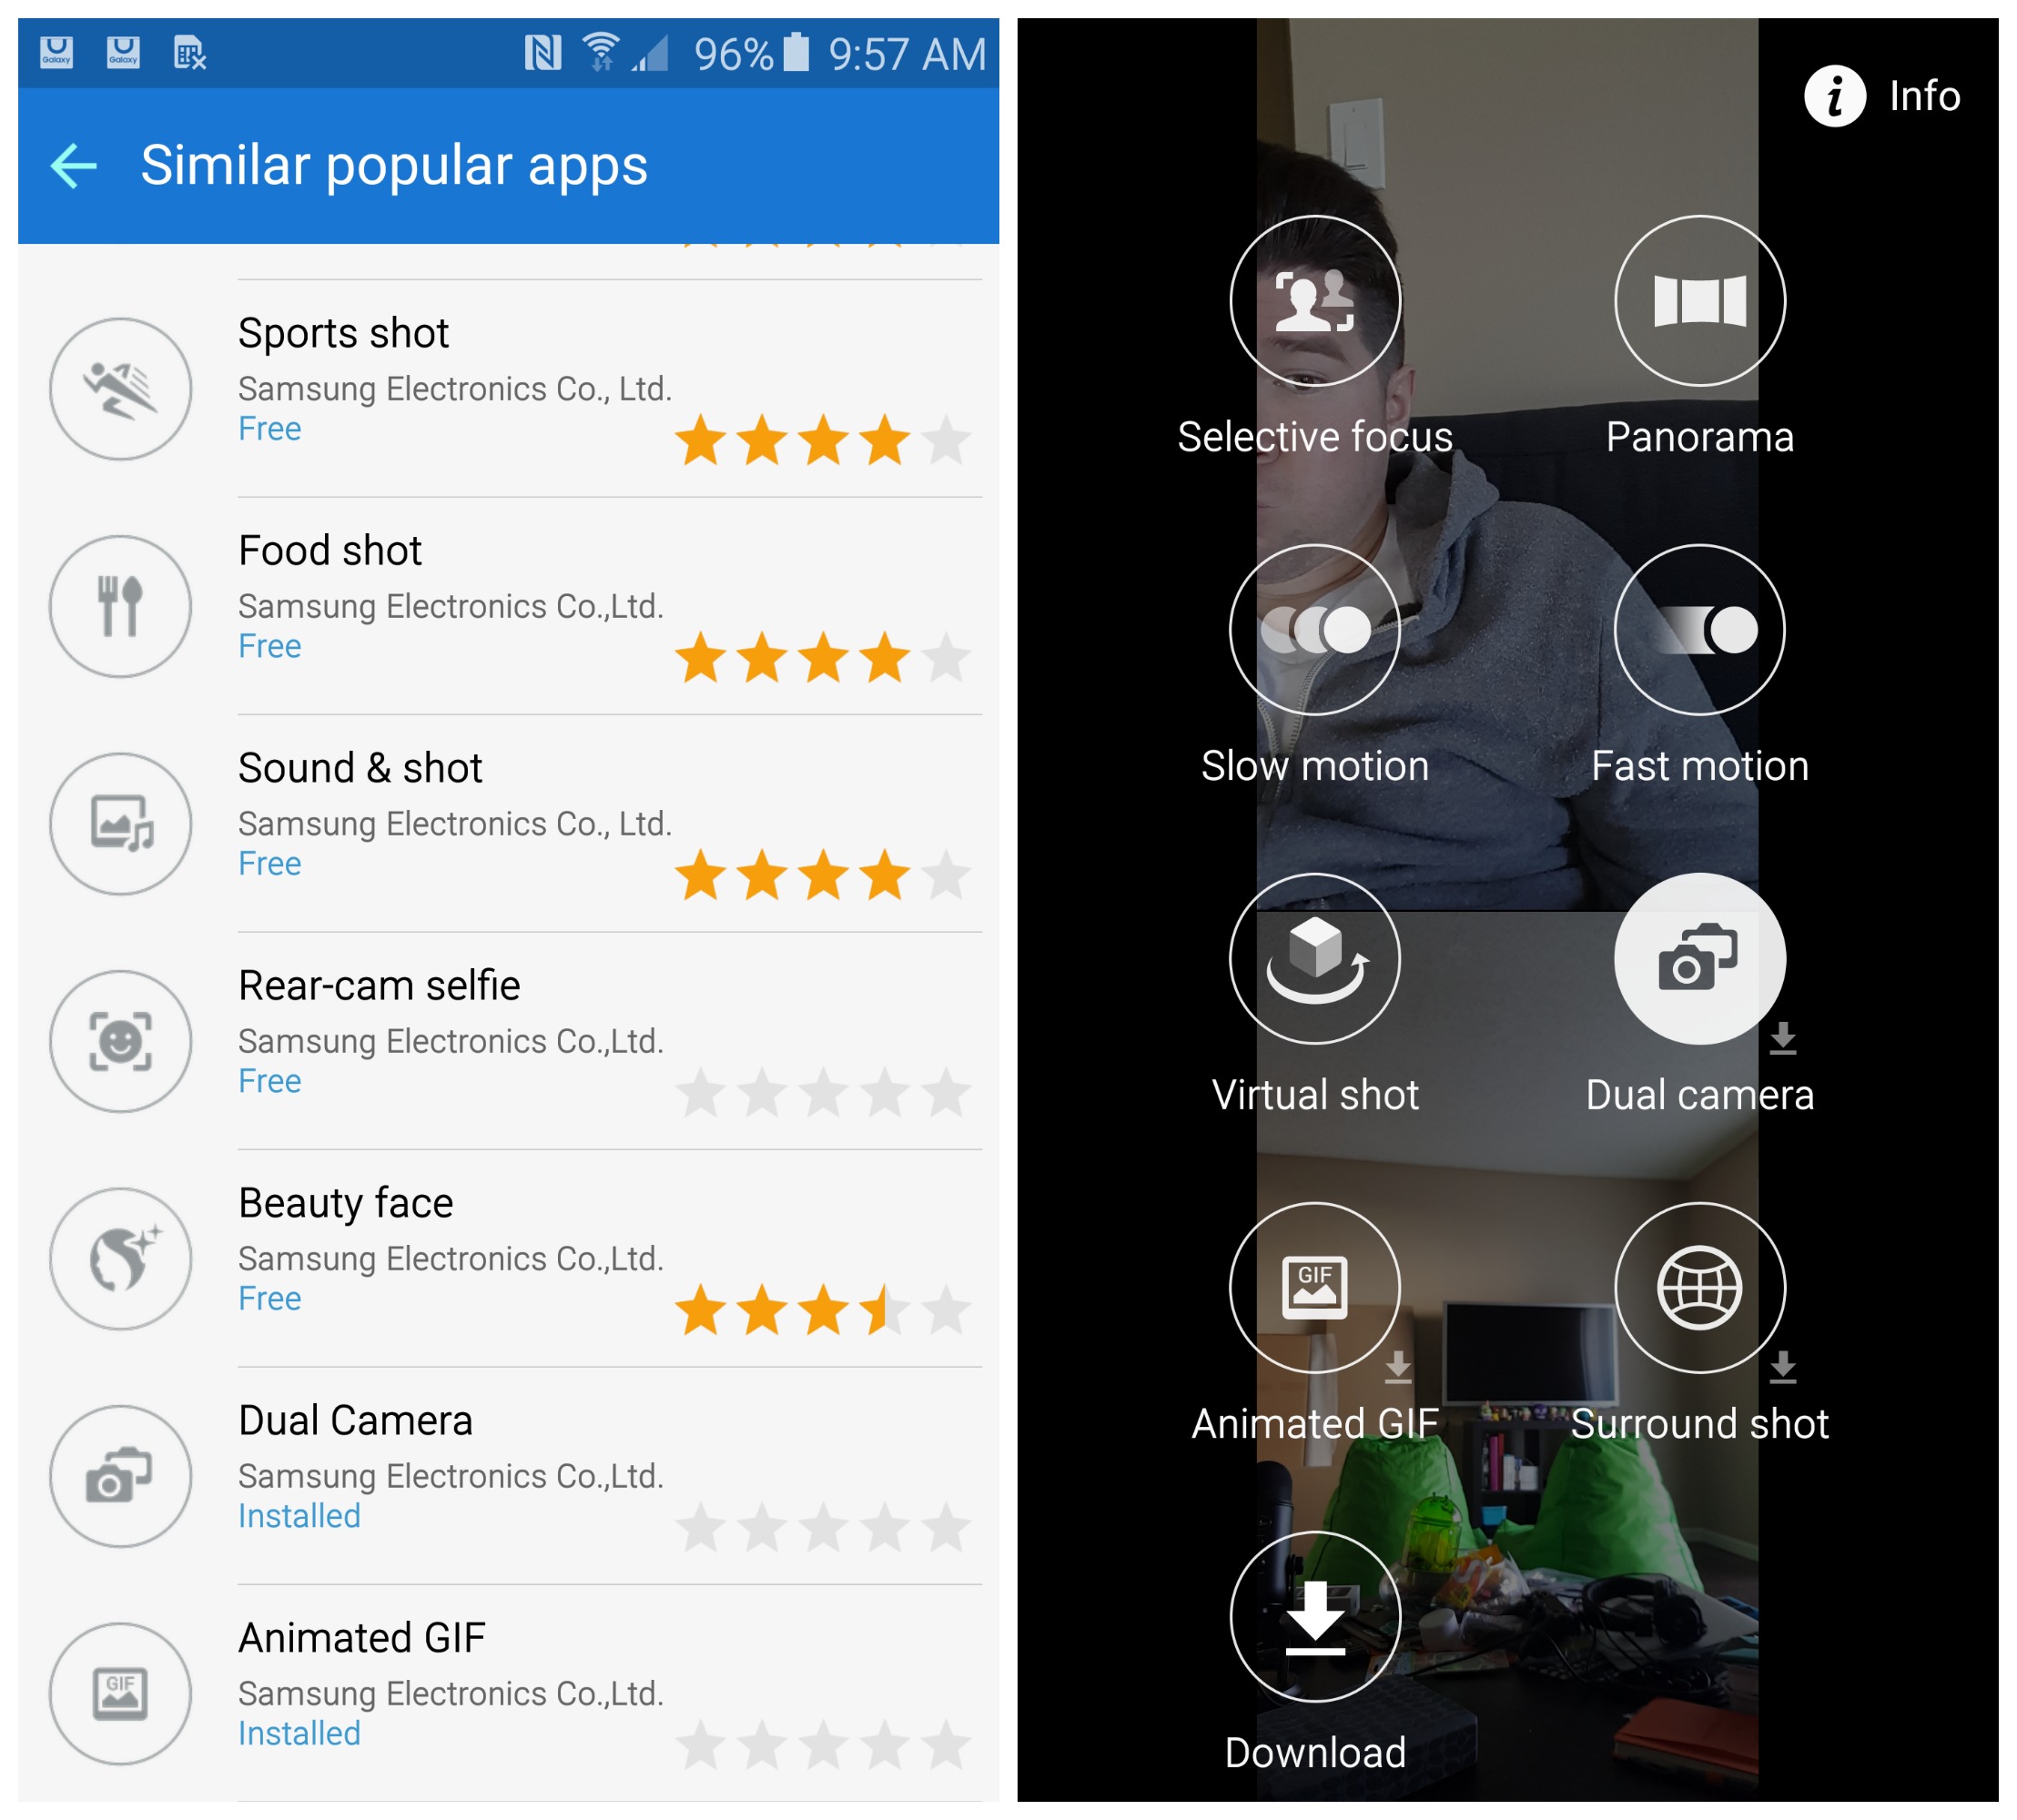
Download cool new camera features from the Samsung Apps Store
You thought we were done? Samsung’s made their camera app extensible, and you’ll be able to take advantage of that fine software engineering by downloading a number of great camera add-ons from the Samsung Apps Store. Here are some of the add-ons they have available early on:
Surround Shot: a Photosphere-like mode that lets you take 360-degree photos
Sound & Shot: record the audio of your surroundings at the time the photo was taken for more immersive photos
Rear-Cam Selfie: use the rear camera to take a selfie with visual cues to let you know when it’s about to snap the shot
Dual Camera: snap a photo or shoot video with both the front and rear cameras simultaneously
Animated GIF: create a moving image of a series of photos or videos and save it as an animated GIF
Beauty Face: image tweaks to enhance the look of human faces
Sports Shot: automatically selects focus and exposure settings for fast moving scenes
Food Shot: a macro-focus mode for bringing out the best details in a close-up shot of food (or anything else, really)
Privacy and Security
How to factory reset your Samsung Galaxy S6
There are many different reasons why one would want or need to perform a factory reset on their Samsung Galaxy S6. This action is typically performed when you are getting ready to sell or return a phone, or when you feel like things have gotten so slow to the point where only a full restore will make it feel new again.
It’s always best to explore other alternatives before going this route, but should you ever need to factory reset your Samsung Galaxy S6 here’s how to do it:
Go to the Settings app
Scroll until you see Backup & Reset, and select it
You will be asked to confirm whether you want to go through with the reset. After thinking it over, select your choice.
Your phone will do a little dance and make a little noise, and you’re done.
Note that a factory reset will only restore device settings, user accounts, system and app data and downloaded apps to their original state. Personal files such as photo and video will persist through a factory reset, so rest easy knowing those are safe.
Setup Android Device Manager in case you lose it
Losing your phone or having it stolen is one of the worst feelings in the world, but many tools are available to help you track it down should the unfortunate scenario occur. One of the best tools is the Android Device Manager.
It’s an app that will not only locate your device using its last known GPS location, but also allow you to remotely sound an alarm, lock the device or perform a full factory reset in case you fear it’s fallen into the wrong hands. The feature is included with almost every Android phone, and here’s how you enable it:
From your device’s apps menu, open Google Settings .
Touch Security.
Under “Android Device Manager,” move the switches next to “Remotely locate this device” and “Allow remote lock and factory reset” to the on or off position.
Register your fingerprint to unlock your phone with the press of your thumb
The Samsung Galaxy S6 now has an awesome fingerprint scanner, and you’re going to want to register your thumbs to use it right away. Here’s how you can get going on that:
Navigate to Lock screen and security in the Settings app
Next tap on Fingerprint and then +Add fingerprint
Follow the instructions until 100% of your fingerprint has been scanned
Create a backup password
Tap Ok to Enable Fingerprint Lock
Now to unlock your phone simply hold your finger on the home button
Repeat these steps to add additional fingers
Note that the fingerprint scanner can also be used to gain access to select supported apps, such as Paypal. It will also soon be possible to use it for logging into websites on the phone’s web browser, and paying for purchases with Samsung Pay once those features become available.
Congrats: you’ve set yourself up with a convenient, yet secure way to access your phone and get into apps without having to deal with clunky passwords every time.
Use Private Mode to keep your content from prying eyes
As much as we’d all like to believe we lead 100% appropriate lives, more than a few of you probably store pictures and files that you don’t want others to see should they need to use your phone. Samsung’s Private Mode is a great feature that helps keep your skeletons locked into the closet where they belong.
The first thing you need to do before taking advantage of this feature is select which types of files you want to protect. This can be done for Photos, Video, Music, Voice Recorder, My Files and the Web browser:
Simply use the app’s multi-select tool to select all the content you want to protect
In the upper right corner, tap MORE and select Move to Private
And now your files are designated to be hidden while Private Mode is enabled. So how do you enable Private Mode? Thought you’d never ask. Here’s how you can set it up:
Navigate to Settings, then Privacy and safety and locate Private mode
Setting Private Mode to “Off” will make it so that the files you specified to be private are hidden from normal viewing, while “On” makes all those files available for normal viewing.
Select whether you want Private Mode to turn off whenever the screen turns toggle Private Mode settings.
And now you can rest easy knowing all those private photos, video and files won’t be seen by anyone who happens to be snooping around.
Setup the SOS function to send quick messages to emergency contacts
We hope you’ll never have to use the Samsung Galaxy S6’s great SOS feature, but it’s here if you need it. What this will do is send a preset message to any contacts you want whenever you quickly press the power button 3 consecutive times.
Think of a scenario where you might be getting robbed and you don’t have time to take your phone out, unlock it, find an appropriate contact, type the message and press send — that all takes less than a minute, but every millisecond is precious in an emergency scenario. You’ll want to set this up, and here’s how you do it:
Go to Settings and look for Privacy and Safety
Select the Send SOS Messages option at the bottom
Turn the switch to “On” to enable the feature.
At the bottom, specify recipients you want to receive the message, as well as any text, photos and audio recordings you want to attach to the message.
Now, the next time you’re in a pinch where you absolutely can’t call or text someone for help, this feature will at least alert your closest family members and friends that you’re in dire need of help. This should be used as a last resort so as to avoid the “boy who cried wolf” scenario, and because sending a more detailed message will help people find more appropriate help.
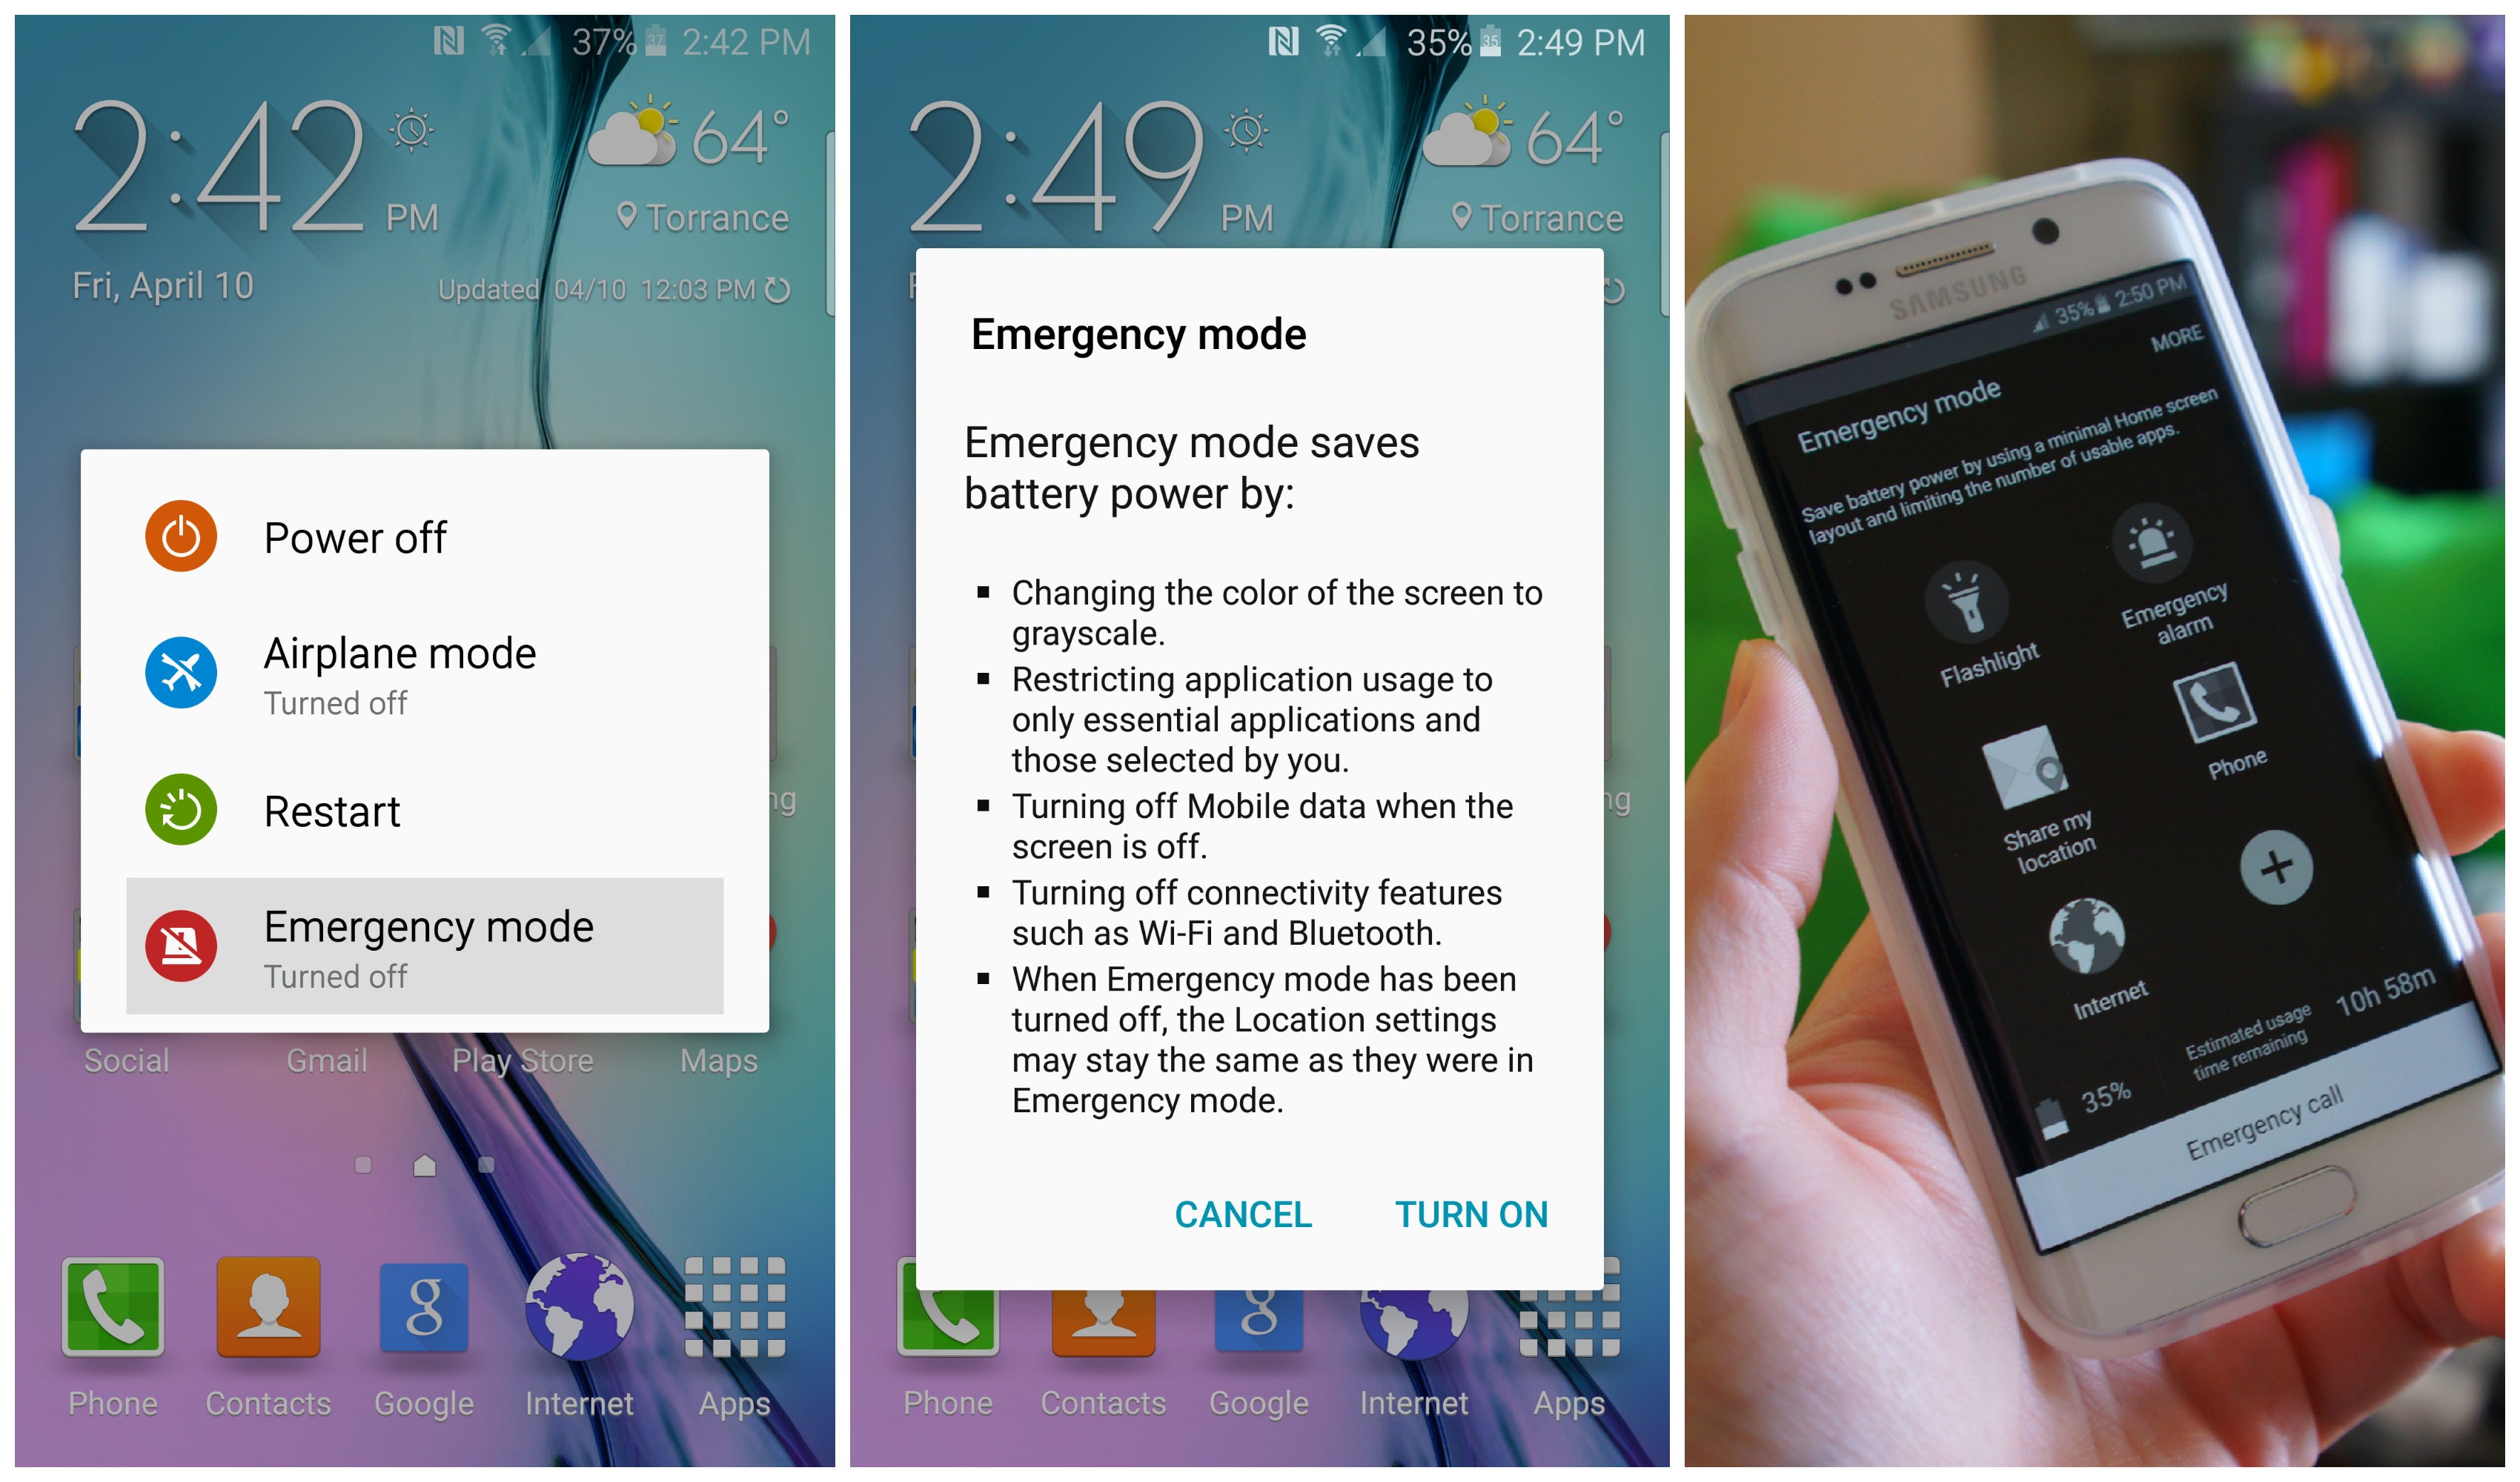
Place your phone into emergency mode to save battery
Power-saving mode not doing it for you? ULTRA power-saving mode still not enough? For those extreme cases where you absolutely can’t shut your phone off and need to squeeze as much juice out of the battery as possible, consider using Samsung’s Emergency Mode.
This feature is an extension of ULTRA Power-Saving mode where Samsung will use a greyscale user interface, scale back processing power and restrict access to a few select apps. The difference here is that background data will be shut off while the screen is turned off, which is key since background data is often the biggest cause of battery drain outside of the display. It will also restrict access to WiFi and Bluetooth.
Here’s how to access Emergency Mode:
Long-press the power button
Select Emergency Mode at the bottom of the list
Press “Turn on” to enable Emergency Mode, or cancel to go back.
Perform the same steps to turn Emergency Mode off when you don’t need it.
Other fun stuff
Download Samsung’s All Together app to stay connected to other Galaxy users
One of Samsung’s coolest apps in the Samsung App Store is AllTogether. It allows you to connect to other Samsung Galaxy users over a private WiFi network to chat, share files and more without having to use mobile data. This is great for something like a camping trip where data might be limited but you still want to be connected to those nearby.
You can download AllTogether by heading to the Samsung App Store and searching for it after you’ve setup your Samsung account.
Download the Kids Mode app to keep your young ones protected when using your phone
Long gone are the days where kids want to play with action figures and plush toys: they want your phone. To keep them innocent, you can download Samsung’s Kids Mode app from the Samsung App Store.
This will lock the phone into a state where kids can only use apps and play games appropriate for them, such as a drawing app, a writing app, and even a kid-centric selfie camera with fun stickers to use.
Your kid won’t be able to exit this mode unless they have the lock code which you setup upon first launch so they won’t be able to find their way into too much trouble. Preventing them from physically damaging the phone is another issue altogether.
Alternatively, use the Pin Window feature to lock your phone to any one app you choose
Similar to Kids Mode, the Samsung Galaxy S6 has a Pin Window feature that’ll allow you to keep the phone locked into one app. Someone say they need to use your web browser? Well, make it so they can only use the web browser and nothing more.
We could also see this being useful for store owners who want to show a specific app on a display unit. Whatever you may need it for, here’s how to pin an app:
Open Settings, go into Lock Screen and Security, then tap Other Security Settings
Look for the “Pin Windows” option and tap it
Make sure the switch is set to “On.”
Specify whether you want your secure lock screen to come up if someone tries to press the home button.
Now that you have it setup, all you’ll need to do when you want to pin an app is open your Recent Apps menu by tapping the Recent Apps key next to the home button, and pressing the push pin icon located in the lower right corner of whichever app it is you want to pin.
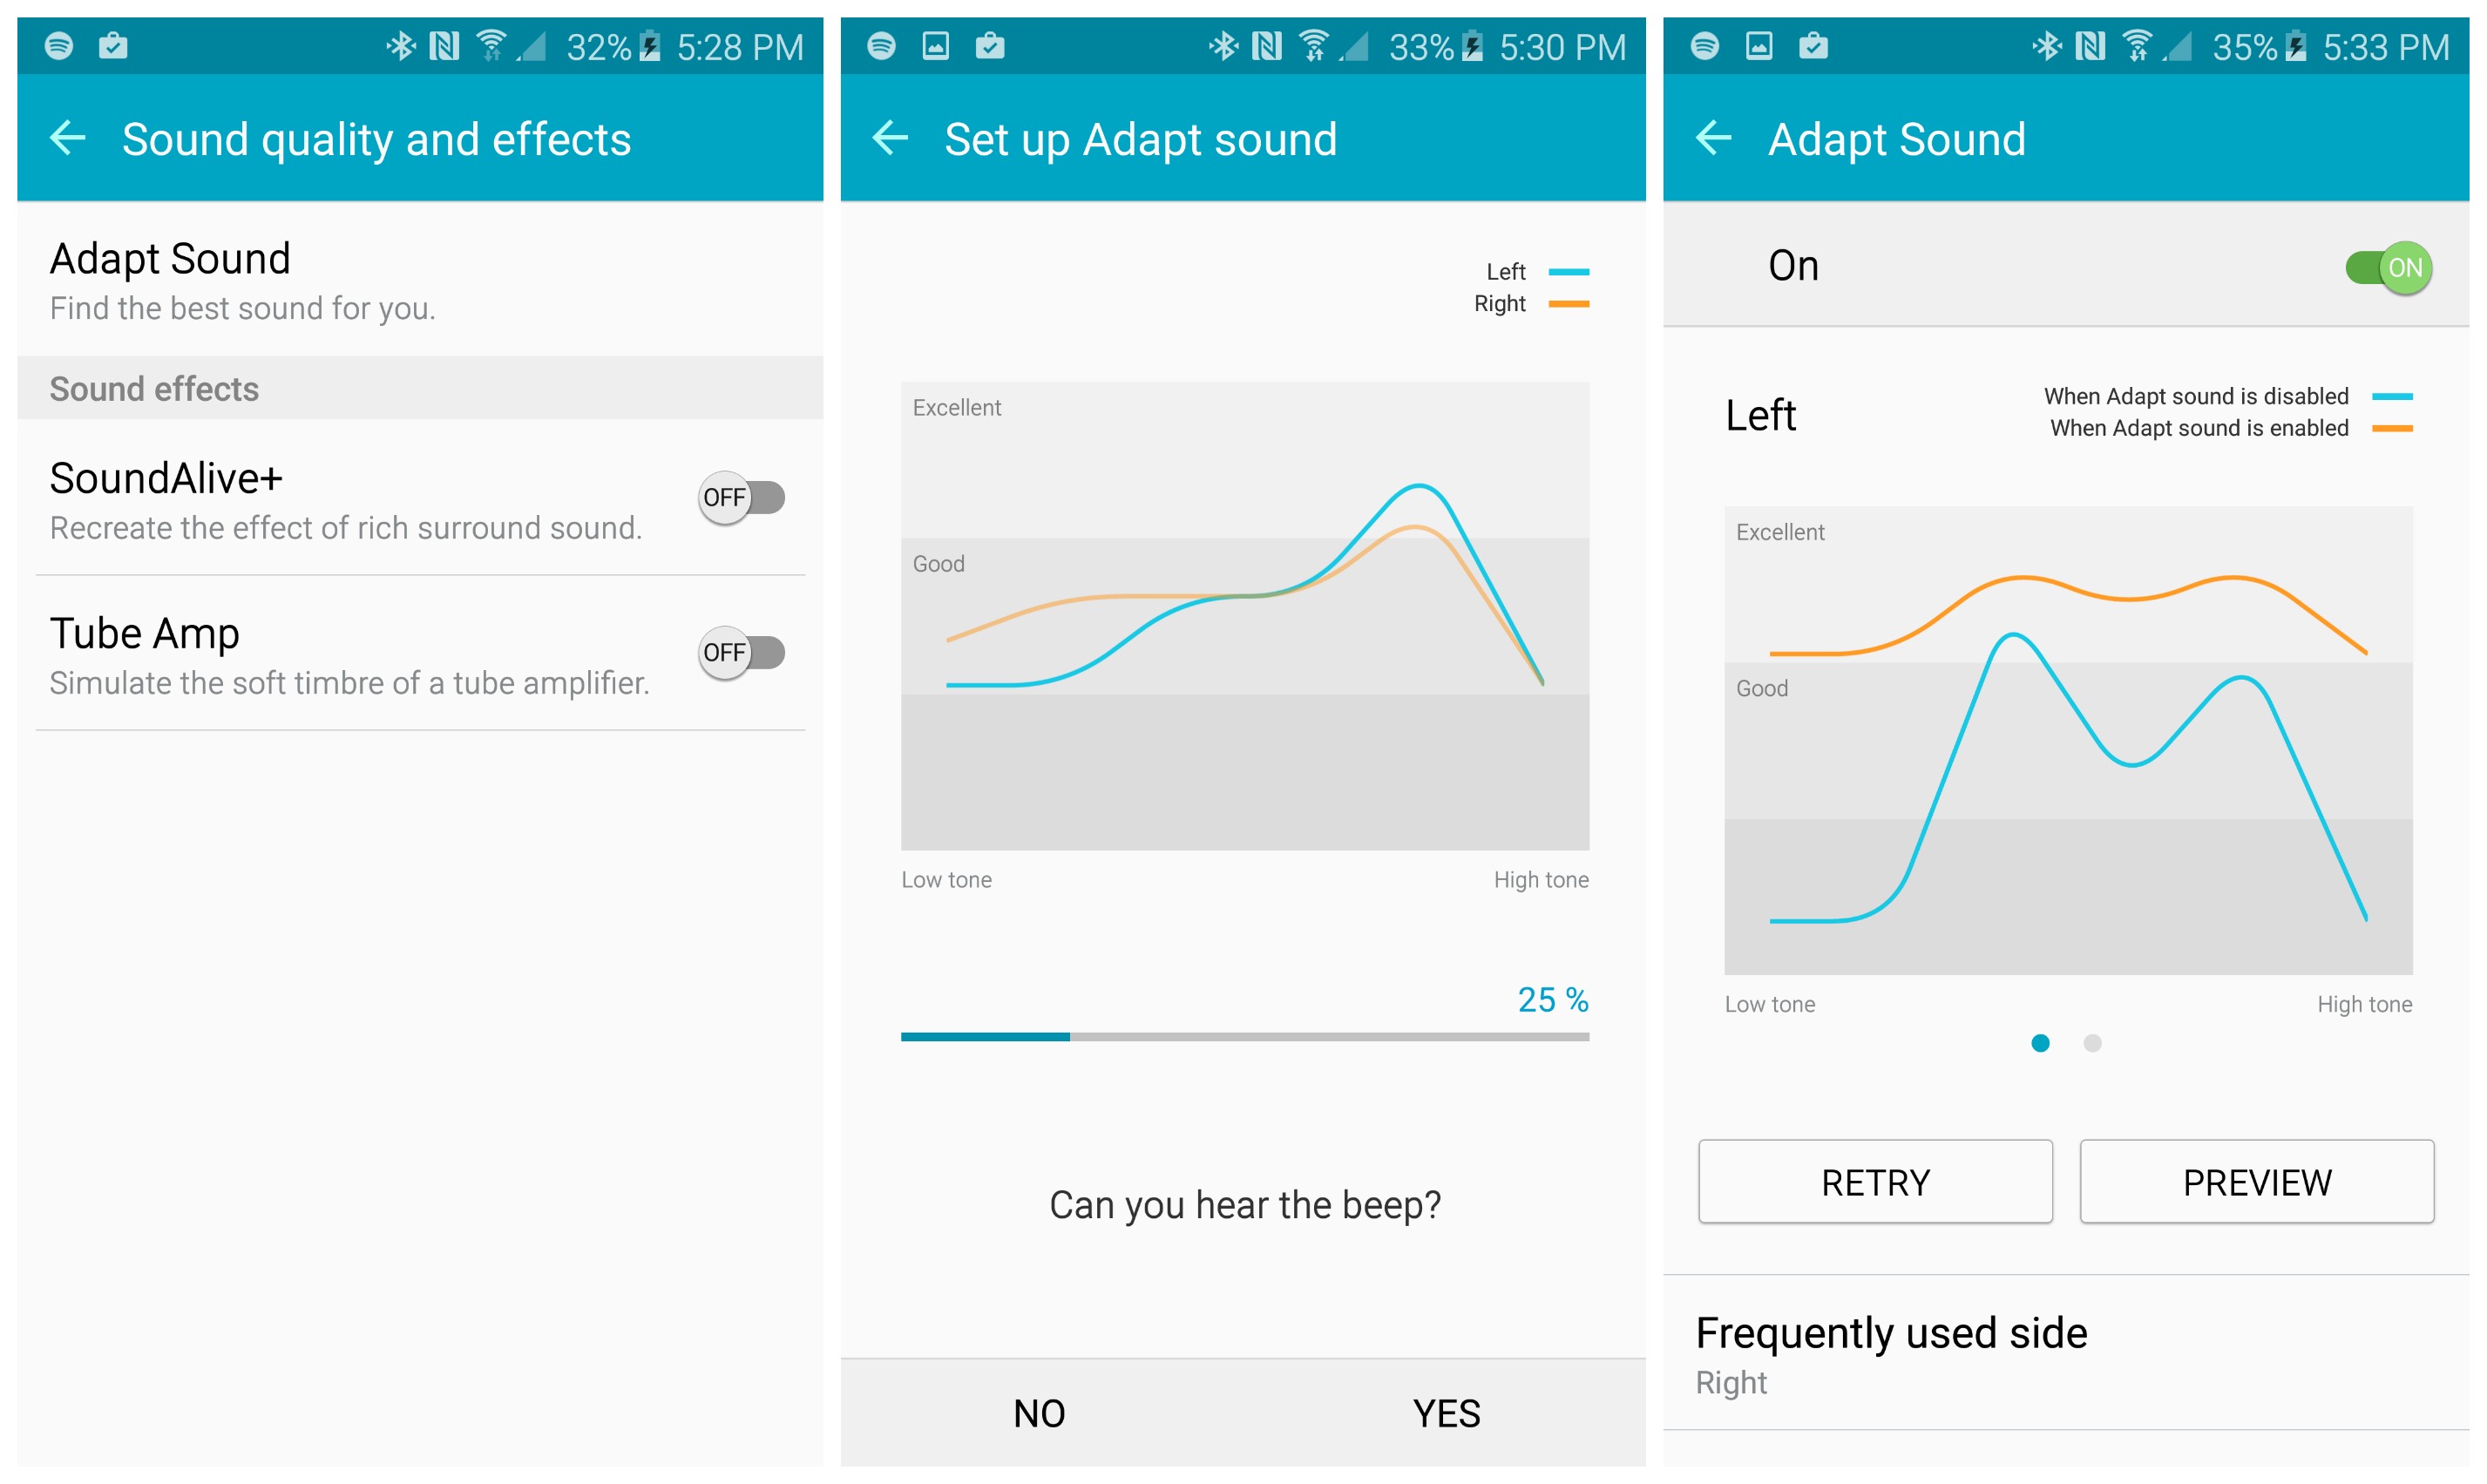
Enhance your phone’s sound using Sound Adapt and SoundAlive+
No two humans are the same, so no two set of ears are the same. You can customize the Samsung Galaxy S6’s sound with two great tools Samsung’s included.
First up, Adapt Sound will help you tune your Samsung Galaxy S6’s sound to make sure you’re hearing everything it has to offer. It does this by playing a series of audible beeps at different frequencies and asking you to note each time you hear a beep. It then uses this data to determine a sound profile appropriate for your ears. You can access this by going to Settings > Sound and Notifications > Adapt Sound.
SoundAlive+ is another great tool to enhance your audio experience. It serves as a device-wide equalizer that you can use to recreate the effect of surround sound (though it obviously won’t be as good as actual surround sound). There’s also an effect that helps you simulate the effect of a tube amplifier. You can find this features under Settings > Sound and Notifications > SoundAlive+ and Settings > Sound and Notifications > Tube Amp.
Visit AndroidForums.com for more help!
Looking for more help? AndroidForums.com has a great section where Samsung Galaxy S6 owners are sharing tips and tricks, helping each other and discussing their awesome new phone with each other. Feel free to jump in by making a new account (it only takes a minute) and jump into some great threads. Here’s just a sampling of what you’ll find over there:
Your HTC One M9 features gesture support to help you jump directly from your lock screen to the services you use most. To enable any of these gestures, navigate to Settings > Display & gestures > Motion gestures.
To use a gesture, start with the screen off. Power on to the lockscreen and then swipe or use the associated button to launch everything from BlinkFeed and widgets to the camera and dialer.
Here are the available lockscreen gestures:
Double tap to wake up & sleep – Double tap the display to wake from sleep; double tap again to put the phone to sleep
Swipe down to turn on voice dialing – With the phone in portrait orientation and the screen off, swipe down from the top of the display to launch the voice dialer
Swipe up to unlock – With the phone in portrait orientation and the screen off, swipe up from the bottom of the display to unlock your One M9
Swipe left to launch widget panel – With the phone in portrait orientation and the screen off, swipe left on the display to launch the widget panel
Swipe right to launch BlinkFeed – With the phone in portrait orientation and the screen off, swipe right on the display to launch BlinkFeed
Volume button to launch camera – With the phone in landscape orientation and the screen off, press the volume button to launch the camera app
Auto answer calls
Another useful gesture allows you to automatically answer incoming calls simply by picking up the phone and placing it to your ear. To enable, go to Settings > Call and check the box next to Auto answer calls.
How to take a screenshot
Taking a screenshot is one of the most basic functions of the HTC One M9. It’s also one of the most asked questions when a new device like the One M9 launches. Here’s how to do it:
Visit the screen you want to capture
Hold down the power button and volume down button
You’ll hear a shutter sound and the screenshot will be added to your notification bar
You can also add a “Screenshot” to the quick settings:
Swipe down from the top of the screen with two fingers to show the quick settings
Tap the paper and pencil icon in the top right to edit the quick settings options
Scroll down until you see the “Screenshot” option
Long press and drag the “Screenshot” option to the top panel of icons
You’ll now see a “Screenshot” button inside the quick settings
New Dot View 2 cases
One of the coolest things HTC has done with the One M8 and now the M9 is the Dot View cases. These cases are so unique and practical that you’ll actually want to use one. A Dot View case allows you to show information in a retro 8-style through your case while still protecting the screen. Simply tap on the case to reveal the information. It’s really cool, here’s how to do it.
You’ll need the HTC Dot View app, which comes pre-installed on the One M9. This is where you can configure how Dot View looks, and even play a cool game. New in Dot View 2 is live backgrounds, the ability to convert images to 8-bit backgrounds, and draw your own. They also added a really cool block-breaker game that you can play with the case closed. Many phones have ways to check notifications without unlocking the device, but Dot View is by far the most elegant.
How to use Easy Mode on the One M9
For folks new to the whole smartphone thing, or if you are picking up the One M9 for an older user who is hard of sight, HTC has included and Easy Mode launcher in addition to the One M9’s standard Sense 7 interface.
To access Easy Mode:
From the Settings menu navigate to Personalize
Tap Change Home screen launcher
Select Easy Mode
Easy Mode features a simplified home screen interface with big icons and text for easy navigation and access to frequently used services. If at any time you wish to return to the Sense 7 launcher, follow the above process and choose Sense 7 in step 3.
How to create custom themes
The HTC One M9 comes with a bunch of pre-installed themes out of the box, but if you’re not a fan of those you can create your own. In fact, Sense 7 can create a personalized theme for you. All you have to do is take a photo. Sense will then identify colors from that photo and change accent colors, icons, and even system sounds.
When you take a photo and view it in the gallery there is a new option to create a theme with that photo. It will ask you to crop the photo, and then it will scan the photo and identify different colors. After that it will present you with several different themes to choose from, all of which are based on the photo you took. It’s a really easy and quick way to get a unique look.
How to set up custom nav bar buttons
Here’s one feature you won’t be able to live without after you’ve had the One M9: custom nav bar buttons. The nav bar is the bar across the bottom of the screen that displays the Back, Home, and Recents buttons. In Sense 7 HTC has added the ability to put an extra user-defined button in the nav bar.
Go into Settings > Personalize > Change navigation buttons to configure from a list of options. You can only add one extra button to the nav bar. Some of the things you can do include turn off screen, toggle auto rotate, open notifications, hide the nav bar (swipe up from bottom of the screen to un-hide), and quick settings. This feature is especially useful for people with small hands because it puts more buttons in an easy to reach location.
Further personalize your One M9
While custom navigation buttons and a slick theme go a long way to make your HTC One M9 truly unique, you can further customize the look and feel of your device’s interface through the Personalize menu found under Settings.
Add or delete home screen panels
You can add or delete home screen panels from your One M9 by navigating to Settings > Personalize > Manage Home screen panels. Here you can add a new panel by swiping all the way to the right and tapping + PANEL. Remove a home screen by highlighting it and tapping Remove. You can also set any panel as your Home landing.
Change wallpapers, system sounds, fonts, and colors
The Personalize menu has further items for a variety of customizations. You may have already changed some of these through HTC’s Themes app, but you can further tweak individual options here. These include:
Change wallpaper– Change your main homescreen wallpaper
Change accent colors – Change the color scheme of your theme
Change wallpaper (lockscreen) – Change the lockscreen wallpaper to display a different image than your homescreens
Ringtone – Change your ringtone
Notification sound – Change the sound played for incoming notifications and alerts
Alarm– Change the alarm clock sound
Font style – Change the system font
Font size – Change the size of the system font
Keyboard color – Change the keyboard background color
Dialer color – Change the dialer background color
How to set a screen lock on the One M9
By default, the One M9 features a basic lockscreen without password protection. You can add an extra layer of security by navigating to Settings > Security > Screen lock. From the following menu you have several choices:
Lock screen – The default setting. Screen locks but is not password protected
No lock screen – Most insecure. Waking the device opens directly to an unprotected homescreen
Pattern – Draw a pattern on a grid of dots to unlock your device
PIN – A numeric PIN unlocks your phone
Password – A text-based password provides access to your homescreen
Protect yourself should your device be lost or stolen
You can choose to hide the names, photos, and other info of certain contacts from appearing on your lockscreen when they call. First navigate to Settings > Security and check the box next to Incoming phone calls.
Next, you will need to go into the People app and set chosen contacts to private. From your contacts list, select the contact, scroll down, and tap Add to private contacts. Their info will not appear on your lockscreen, but remember, this means you will not see incoming caller info for this contact either.
How to use the HTC Help app
Chances are if you’re the type of person to read an Android blog you’re also the type of person who is always asked about phones. Your grandma can’t figure out how to log into the Facebook app, or your sister can’t figure out how to use emoji. There are a million questions you or someone you know can have about a new phone like the One M9, and sometimes things simply don’t work. What do you do?
HTC has included a new app called “Help” that will help users troubleshoot problems and get help remotely. The app is designed to be very easy to use. There are different sections for different parts of the phone so you can narrow down your problems. The really cool feature of the app is when you can’t find a solution on your own, and this is where you can get out of helping someone else.
In the app you can contact HTC for remote assistance. It uses LogMeIn to allow a HTC representative to remotely control your phone for you. All you have to do is sit back and watch the person perform the action. For example, if you couldn’t figure out how to turn off Bluetooth the rep could remote access your phone and toggle it off for you.
Use the HTC adaptive home screen widget
HTC is all about adding features to the Android home screen. Last year they introduced us to BlinkFeed, a stream of information that lives just a swipe away. Now, with the latest version of Sense, HTC has added “Sense Home Widget.” The widget tries to predict which apps you’ll want to use at a particular time or place.
If Sense determines that you are at work the widget might display productivity apps. When you come home from work the widget might show entertainment apps. The idea of changing the home screen for different situations is not new. In the past manufacturers have made it possible to set up different profiles for different places, but Sense Home Widget does all of that for you. If you don’t want to use it you can simply remove the widget.
Remove the Suggestions folder
HTC has also added “Smart Folders” to Sense 7. By default the One M9 comes with a “Downloads” and “Suggestions” folder. The Downloads folder automatically fills up with newly downloaded apps, which can be handy. The Suggestions folder, on the other hand, should be removed as soon as possible.
The Suggestions folder is basically HTC using space on your home screen for advertisement. In the folder you will find suggested apps such as Clash of Clans and Candy Crush. HTC says that the suggestions change, but we’re not sure how it decides which apps to suggest. At the end of the day it’s just apps that have paid HTC to be promoted. Remove it.
Add content to BlinkFeed (or remove it completely)
BlinkFeed is HTC’s all-in-one landing for your news feeds, social updates, and new location-based suggestions, all easily accessed with a simple swipe to the left from your homescreen. Configuring BlinkFeed to work the way you want is easy.
To add or remove items from BlinkFeed:
From your homescreen, swipe all the way to the left to access BlinkFeed
Tap the menu icon in the upper lefthand corner
Tap the three vertical dots to access the expanded menu
From the menu tap Add content or Remove content
You will now be able to choose the content you wish to view in your BlinkFeed by choosing from a selection of news sites and blogs (or alternatively unselecting the sources you no longer wish to receive updates from).
To link a social network like Twitter or Facebook:
From your homescreen, swipe all the way to the left to access BlinkFeed
Tap the menu icon in the upper lefthand corner
Tap the three vertical dots to access the expanded menu
Tap Services & Apps
Select the desired service from the menu and follow the prompts to log in
To enable to disable location-based suggestions
From your homescreen, swipe all the way to the left to access BlinkFeed
Tap the menu icon in the upper lefthand corner
Tap the three vertical dots to access the expanded menu
Tap Settings
Select Notification on lockscreen
Check or uncheck Meal time bundle
Remove BlinkFeed from your homescreens
If you wish to remove BlinkFeed from your homescreen rotation altogether, you can do that as well. Simply navigate to the BlinkFeed settings menu as described above, select Manage home screen panels, select your BlinkFeed panel, and tap Remove. You can restore BlinkFeed at any time by navigating to Settings > Personalize > Manage Home screen panels.
Enable HTC Connect to stream media to other devices
With HTC Connect, you can easily stream media files to supported devices. First, enable HTC Connect for your devices by navigating the Settings > HTC Connect. From this menu, select the default device for HTC Connect. If no devices appear, tap the three dots in the upper righthand corner, accessing the expanded menu, and tap Scan.
Pro tip: From the expanded menu, tap Scan options to choose which types of devices to include in your scan. HTC Connect supports AllPlay, Blackfire, Bluetooth, DLNA, and Miracast.
Once you have enabled a default HTC Connect device, a three-finger upward swipe on your One M9’s display will send audio and video to your connected equipment. Make sure this gesture is enabled by navigating to Settings > Display & gesture and checking the box next to Media gesture.
Connect your One M9 to the HTC Mini+
The One M9 can effortlessly pair with HTC’s Mini+, a quirky little device that acts as an extension of your smartphone for making and receiving calls. It might be thought of as a phone for your phone.
To connect the Mini+, navigate to Settings > More > HTC Mini+, then choose whether to pair via Bluetooth or NFC. Follow the onscreen instructions to pair the two devices.
Change the default messaging app
If you prefer to use Google’s Hangouts over the default messaging app provided by HTC, you can change your preferences by navigating to Settings > More > Default messaging app. Choose your preferred app from the list. Now, any apps or system options that launch your messaging application will default to your chosen service.
Lock device access to a single app with screen pinning
If you let a friend borrow your One M9 to read an article, or if you are the type that has small children around who enjoy watching videos or playing games on any smartphone within reach, Android Lollipop has the feature for you. Screen pinning locks you phone to one app, and that app can only be exited with a special button combination combined with your security code (if you so choose).
To pin an app:
Enable screen pinning by navigating to Settings > Security > Screen pinning
Tap the overview (formerly multitasking) button to open your recent apps
Tap the pin icon on the app you wish to pin (note: you will only be able to pin your most recently opened app, so you might need to open the app again and then return to the overview view to pin)
Choose if a lock code will be required to exit the app
To exit a pinned app, simply press the overview and back buttons simultaneously and hold for a second or two.
Enable NFC for use with mobile payments
To enable NFC, head to Settings > More and tap NFC. With NFC enabled, your phone is capable of a number of useful functions, not the least of which is tap-to-pay mobile payments. HTC does not include any built-in mobile payment functionality, however, so you will need to download a service like Google Wallet (where compatible).
With NFC enabled, you can also take advantage of tap-to-pair functionality with accessories like Bluetooth speakers (provided they support NFC) and also apps and services that rely on NFC to transfer data between smartphones.
Use the HTC One M9 even if you are wearing gloves
For when the chilly winds of winter blow, you won’t have to worry about removing your warm gloves in order to use your One M9. HTC has included a handy glove mode that increases touchscreen sensitivity to read input even through a layer of fabric.
To enable glove mode, navigate to Settings > Display & gestures and tap the check box next to Glove mode.
How to improve One M9 battery life
The HTC One M9 has a big enough battery to get you through the typical day, but should you find yourself in that precarious situation where no outlet is nearby and your power is dwindling, you have some options.
As with all Android Lollipop devices, the One M9 comes with a built-in battery saver mode. It will trigger automatically when your phone drops down to 15%, but it can be manually enabled by navigating to Settings > Power and flipping Power saver to the On position. An Ultra power saving mode can be enabled using the same process.
Show battery level percentage in the notification bar
If you wish to see your battery level percentage always displayed in your notification bar, go to Settings > Power and check the box next to Show battery level.
Enable the Daydream screensaver and use Sleep Mode to conserve power
To save your phone’s display from burn-in (or to simply offer a pretty backdrop while docked or charging) enable Daydream, found under Settings > Display & gestures. You can choose to display Colors, your Google Photos, or News & Weather. Tap the three dots in the upper righthand corner to choose when to Daydream (while docked, while charging, or both). You can also launch Daydream directly from this menu.
To conserve power while not using your device, enable Sleep mode under Settings > Power. Sleep mode will disable your phone’s data connection during long periods of inactivity.
Choose which apps use the notification LED and when
The notification LED is a dying breed on Android devices. Luckily for One M9 owners, not only do we get a flashing light to inform us of things like missed calls and messages waiting to be read, but we can also choose which apps take advantage of the light and when.
To setup the notification LED, navigate to Settings > Sound & notification. From here tap Flash notifications to choose whether to always flash the LED light or only when the display is turned off.
To set flash notifications for individual services, tap App light notifications. From here you can choose to use the LED notification light for missed calls, voice mail, messages, calendar events, mail, and alarms.
Set application notification priority levels
As with all devices running Android Lollipop 5.0, you can set notification priority levels on an application-by-application basis. To do so, navigate to Settings > Sound & notification > App notifications.
From the list, choose the app you wish to modify the notification settings for. You can choose to Block all notifications or set a Priority notification level, which will surface notifications from the app in question above others of a normal priority level.
You can alternatively change an application’s notification priority by long pressing a recent item in your notifications pane and tapping the (i) icon to access the app’s settings directly.
Quiet the ringer when you pick up your One M9 (or make it louder when its in your pocket)
The HTC One M9 can be set to automatically alter ringer volume level based on gesture input. To alter these settings, go to Settings > Sound & notification.
Check the box next to Quiet in on pickup to automatically lower ringer volume when you move the phone before answering an incoming call.
Check the box next to Pocket mode to increase ringer volume when the One M9 detects it is inside a pocket or bag.
Get perfect audio from your BoomSound speakers
HTC’s BoomSound speakers in the One M9 provide some of the loudest, full-stereo audio you will find on a smartphone. The phone also features two Dolby audio profiles to get you perfect sound no matter what your listening environment. To change BoomSound audio profiles, go to Settings > HTC BoomSound with Dolby Audio.
For a cinematic experience to go along with video playback, select Theater mode. If you are listening to music, opt for Music mode instead.
HTC One M9 camera tips & tricks
HTC’s camera software is clean and straightforward on the One M9, but it’s hiding a lot of power under the surface. Here are a few helpful hints for making the most of the One M9’s 20.7MP camera.
Change and add camera modes
To switch between camera modes, simply swipe up or down on the display from within the camera app. Default modes include Selfie, Panorama, and Camera. Alternatively, tap the four dots at lower righthand corner of the display to choose your camera mode. From this screen you can also add camera modes including Bokeh, Photo Booth, and Split Capture.
Dial in shooting parameters and save custom camera modes
Tap the three dots in the lower lefthand corner to dial in camera settings including ISO, Exposure, and White Balance. Tap the gear icon to adjust settings like aspect ratio and image resolution as well as access further settings like Contrast, Saturation, and Sharpness, all found under Image adjustments.
Once you have dialed in the perfect camera settings, you can save as a new camera mode for quick recall. After tapping the gear icon, tap Save custom camera. Access your camera preset by swiping up and down on the display or tapping the four dots in the lower righthand corner.
Enable touch capture and auto shutter
Tap the three dots in the lower lefthand corner then the gear icon and navigate to Camera options. From here you can enable Touch to capture (photo is snapped when you touch to focus on a specific area of the display) Voice capture (say “Cheese” or “Capture” to take a photo, “action” or “rolling” for video), or Auto smile capture (focus on a smiling face and photo is taken automatically).
Use volume buttons as shutter or zoom
By default, the One M9’s volume buttons have no special functionality, but you can assign them to control zoom or shutter when in the camera app. Tap the three dots in the lower lefthand corner, the gear icon, and scroll to General Settings. Tap Volume button options to assign a new function.
Visit Android Forums for more!
Did you know Android Forums, the premier destination for Android discussion on the internet, has a dedicated HTC One M9 forum? Of course you did, so why not use it to your advantage? It’s the perfect place for newbs and seasoned vets alike to come together to share their experiences with the One M9, unearth even more tips and tricks, and ask and answer any lingering questions about HTC’s latest.
Before signing off, check out just a few of the threads you will find:
LG and Colby Brown are continuing their informative series on the LG G4’s top notch camera (which we gave some pretty good marks in our LG G4 review).
This time, the professional photographer is dishing out 5 tips to take great photos with the device’s 16 megapixel f/1.8 lens. Here’s a recap of everything covered in the video:
1. Make good use of the f/1.8 aperture
A wide aperture (f/1.8 is as wide as it gets for a smartphone camera) means more light gets to the lens. More light means more clear photos. Since it isn’t possible to change the camera’s aperture, this “tip” is more of just to say: go out there and shoot without any fear, because there’s no other smartphone camera out there that can capture as much light as the LG G4’s.
2. Use Manual mode for advanced control
You can use manual mode to adjust shutter speed, ISO, white balance and other exposure controls to your liking. Here’s a general breakdown of the exposure triangle (the trio of settings — ISO, shutter speed and aperture — that determine a photo’s lighting):
ISO: How much image noise is used to fill in color spots to make for a balanced image. The lower the ISO, the less noise, but if you lower the ISO you will need to make sure you have adequate lighting as it will lower the overall exposure of your image. The trick is to get your ISO as low as possible without underexposing your image.
Shutter speed: The speed at which the shutter snaps determines a couple of different things. A slower speed lets more light into the image, as the shutter is opened longer to allow more light to get in. The downside is that slow shutter speeds might not be appropriate for fast shots such as taking photos of children playing sports, otherwise it’s bound to come out blurry. That said, using a slow shutter speed can be used to do some pretty neat stuff if you’re creative, so just play around with it.
Aperture: the third spoke on the exposure triangle is typically aperture, but since it’s not possible to adjust this then you will always have to maintain a constant of f/1.8. That means you’ll need to primarily tweak ISO and Shutter Speed appropriate to your situation and liking.
White Balance: this extra variable determines the type of color temperature you want for your photo to make sure lighting is accurately depicted. It’s often fine to stick with basic white balance presets, but it’s worth brushing up on the various temperatures and which situations they’re appropriate for. The folks at FStoppers have a pretty good breakdown.
The learning curve for using manual mode is obviously more steep than setting the camera mode to auto and letting the software pick your settings, but if you understand these concepts and commit to practice you’ll find yourself to have a lot more control over the way your images turn out (and you’ll know exactly what to do to avoid bad ones).
3. Embrace the Color Spectrum Sensor
The LG G4’s camera has something called a “Color Spectrum Sensor” that can accurately identify both infrared and RGB spectrums of light. What this will allow it to do is get an accurate reading of the sort of colors that are in your shooting environment and make sure the camera captures those colors as nature intended.
4. Use Optical Image Stabilization
This one should be a no-brainer — use optical image stabilization whenever possible. If you don’t know what it is, optical image stabilization uses hardware to diminish the shaky camera effect that can often ruin a photo or video. It’s much preferred over software-based image stabilization which can often times do more harm than good.
It’s a feature that you shouldn’t take for granted considering there are still an alarming amount of flagship devices that don’t implement it. Know it. Use it. Love it.
5. Don’t shun the selfie
The LG G4 comes with an 8 megapixel selfie camera, which is a whole lot of camera for something that will only be used in limited situations. Still, when the need to take a selfie arises you’ll be glad it’s there. Like tip #1 above, this is less of a tip and more of a PSA: don’t let anyone tell you it isn’t cool to take a selfie. It’d be a shame to waste 8 megapixels of front-facing goodness over principle.







![SmartStay[0]](http://phandroid.s3.amazonaws.com/wp-content/uploads/2015/01/SmartStay0.gif)